
Here’s a summary of all of our metered consumption for 2014. The electricity, heating oil (furnace, domestic hot water) and water are for the 2048 square foot house that Catherine, Oliver and I live in. The gasoline is for our 2000 Jetta and various rental cars. What isn’t included is gasoline used for business, or consumption in my office or Catherine’s studio.
| Energy | Supplier | Consumption | Cost |
|---|---|---|---|
| Electricity | Maritime Electric | 5,518 kWh | $1,117.69 |
| Heating Oil | Coop Energy | 3,710 litres | $4,344.10 |
| Gasoline | Various | Unknown | $868.77 |
| Water | Charlottetown Water & Sewer | 128,000 litres | $408.73 |
Compiling this information was easy, as all of our bills are now sent electronically, and so I have them archived in Evernote (gasoline was the exception: I had to hunt through my MasterCard bills for gasoline purchases).
About a month ago I received an invitation, under the aegis of my role as Hacker in Residence, Robertson Library, to a meeting in the library with the team working on publishing the ebook and audiobooks versions of author H. Wade MacLauchlan’s biography Alex B. Campbell: The Prince Edward Island Premier Who Rocked The Cradle. While the printed book was published by the PEI Museum and Heritage Foundation, the library had taken on the digital publishing task, with the proceeds from digital sales generously directed towards the library’s digitization program.
By the time I joined the effort all of the heavy lifting of the digital project – recording the audiobook, preparing the EPUB, and building a website to sell them – was done, and so my contributions consisted primarily of making pithy comments like “why are you charging in the first place, man: information wants to be free.”
Okay, I didn’t actually say that. At least I didn’t say it like that.
But my arguments fell on deaf ears and the capitalist impulse, or at least the enlightened capitalist impulse, won the day, and so I latched onto a tiny offshoot of the project: getting the digital books into the various proprietary platforms – Google Play Books, iBooks, Kindle, Audible – where they might attract a broader audience.
So I started the project being a defender of information’s right to be free and then became one of its jailers. Irony noted.
What has followed, over the past month, has been a fascinating deep dive into the arcane world of digital publishing: EPUB formats, metadata, bank accounts, asserting rights ownership. The whole exercise nearly came crashing to a halt when the intractable finance department at UPEI refused to allow its bank account to be the repository for funds from Apple et al. But I was able to route around all intractability, institutional and technical, and so I am happy to say that you can now purchase the Alex Campbell biography at fine digital stores everywhere, worldwide:
- Amazon.ca Kindle (Canada):
- Amazon.com Kindle (USA)
- Amazon.co.uk Kindle (UK):
- Google Play Books
- Google Books
- Apple iBooks
On the Kindle and Google Play what you’ll purchase is a handcrafted EPUB that I stitched together from an InDesign HTML export; this is a “reflowable” EPUB, with endnote references linked to the endnotes, that works equally well on phones, tablets and on the desktop. The Apple version is a straight non-reflowable EPUB that came right out of InDesign; I’m working on upgrading this to a more flexible format.
As to the audiobook, that’s the next frontier: what I discovered is that Audible.com own the audiobook marketplace, at least in North America: if you want your audiobook on Audible, iTunes and Google Play, you need to get the book on Audible, and to get on Audible requires a U.S. address, a U.S. bank account, and following some strict audio format guidelines. I’ve cracked the address and banking questions; the audio formatting will get underway next week.
In the meantime, you can purchase the audiobooks – and, indeed, the ebook – directly from the library, where the library keeps 100% of proceeds rather than the crumbs that the multinationals pass on: just visit AlexBCampbell.com.
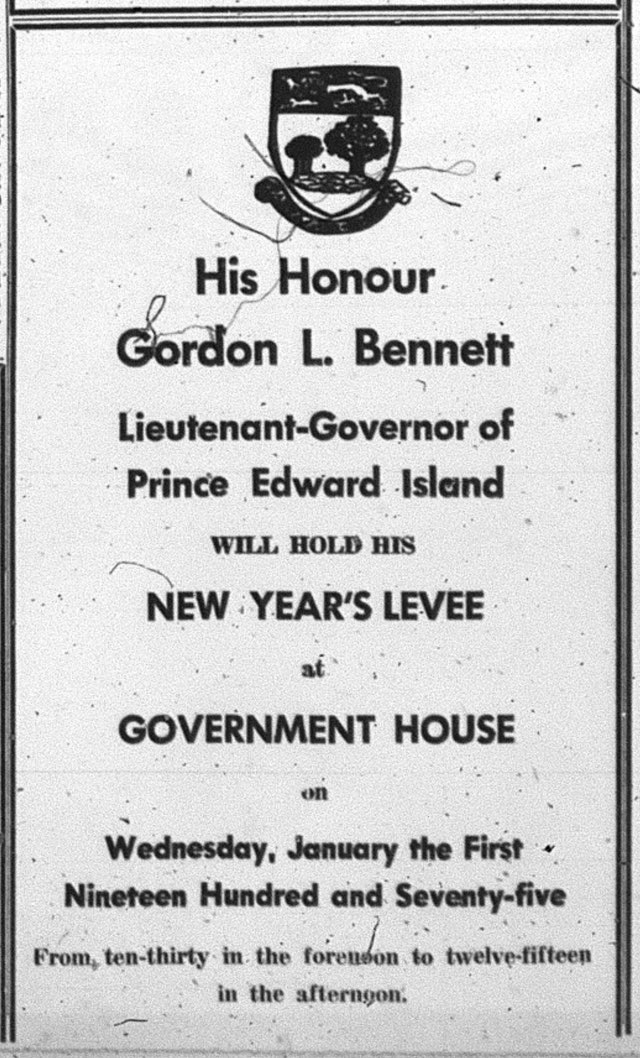
As I reported yesterday, January 1, 1975 was the first year that women were welcomed, albeit somewhat grudgingly, at the annual New Year’s Day levee at Government House in Charlottetown.
But that wasn’t how the story began: here’s the front page of The Guardian from December 10, 1974, with the headline “Governor Bars Women From New Year’s Levee”:
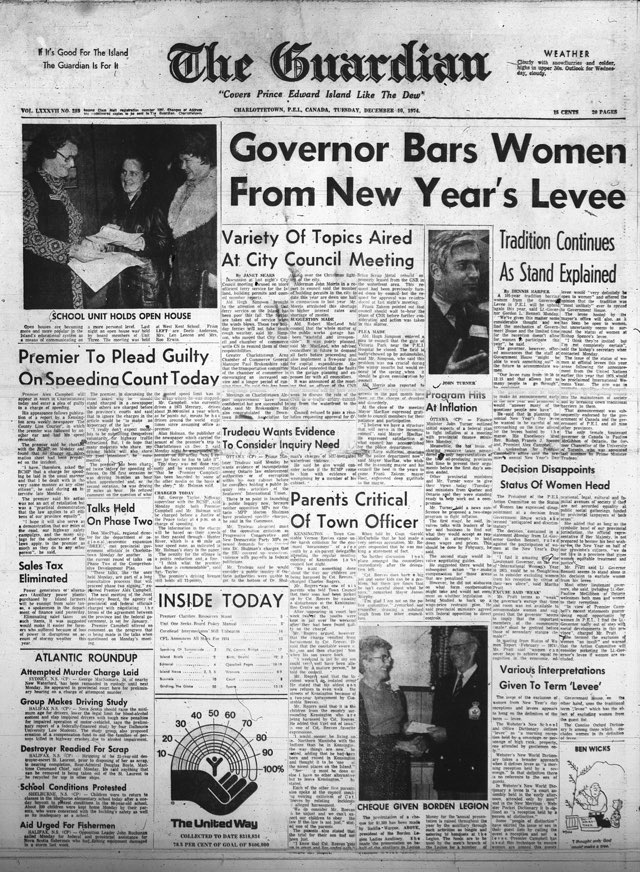
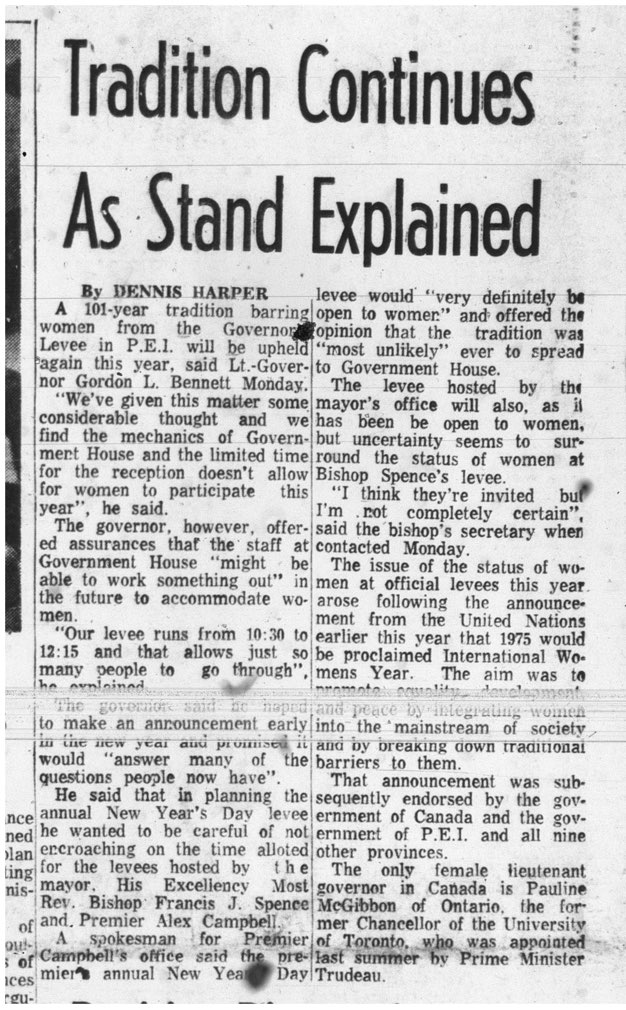
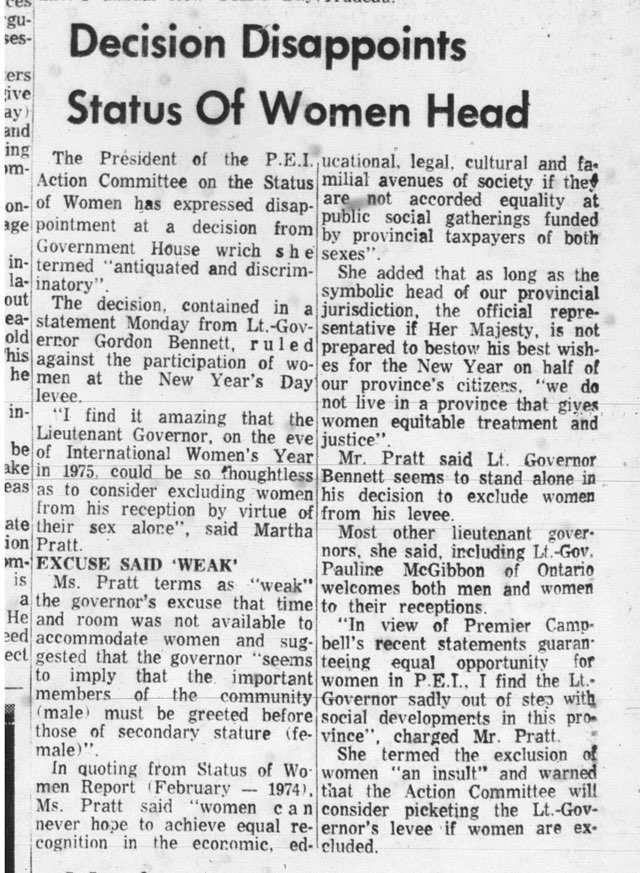
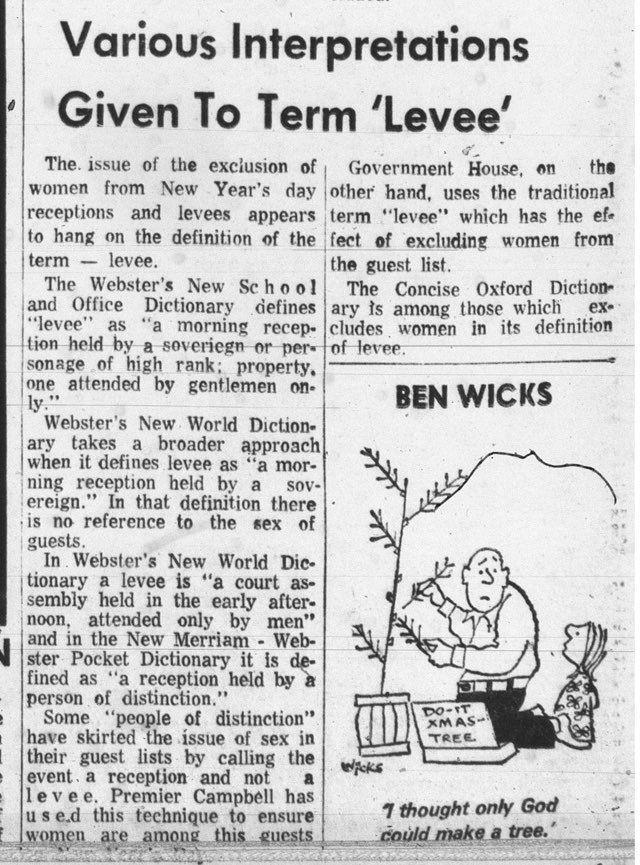
Under that headline there were three stories, under the sub-heads “Tradition Continues As Stand Explained,” “Decision Disappoints Status Of Women Head” and “Various Interpretations Given To Term ‘Levee’ ”:
To its credit, The Guardian ran an editorial in the same issue headed “Change Due,” and calling the ban on its blatant sexism: “Granted, time may be limited for the reception, but since it is a ‘hello’ and ‘goodbye’ affairs of persons meeting His Honor what has ‘mechanics” got to do with the sex of a person?”:

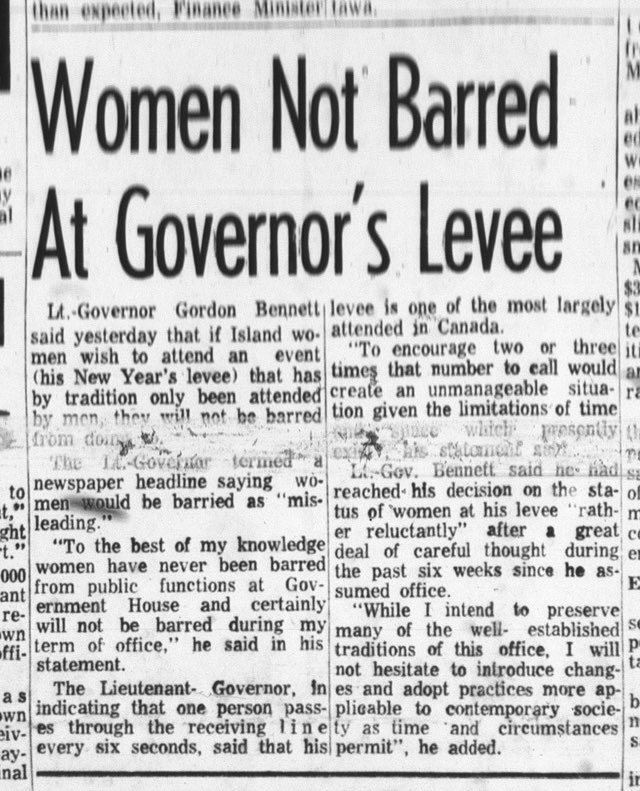
More rational heads obviously prevailed, as the next day’s paper updated the story: “Women Not Barred at Governor’s Levee”:
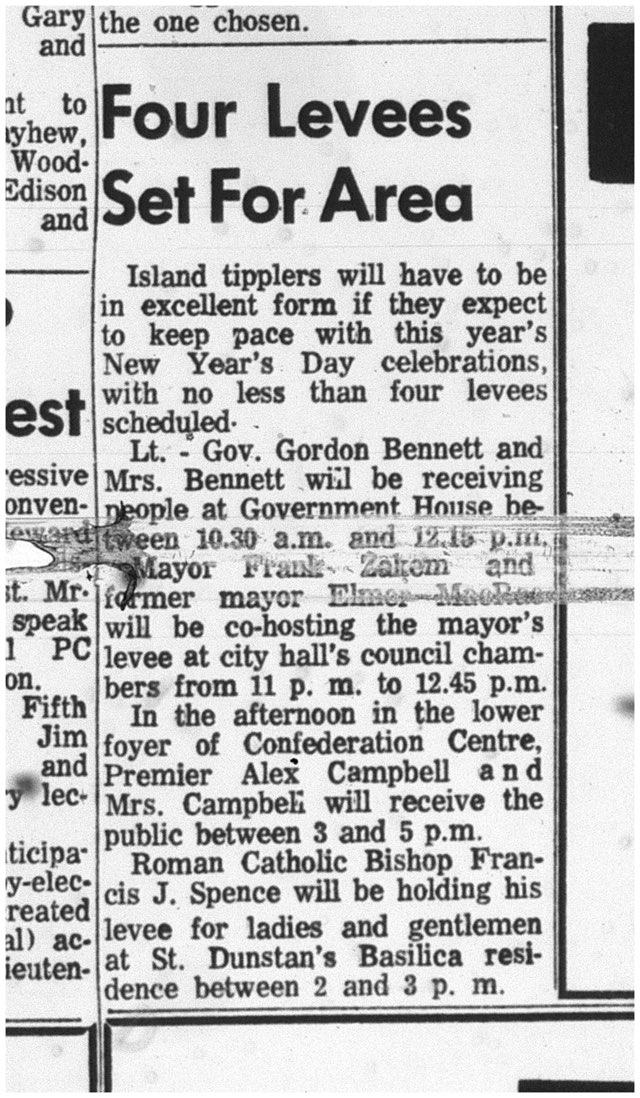
Later that month, as January 1, 1975 approached, The Guardian comments on the busy levee schedule, with four levees – Lieutenant Governor’s, Mayor’s, Premier’s and Bishop’s – scheduled for New Year’s Day:
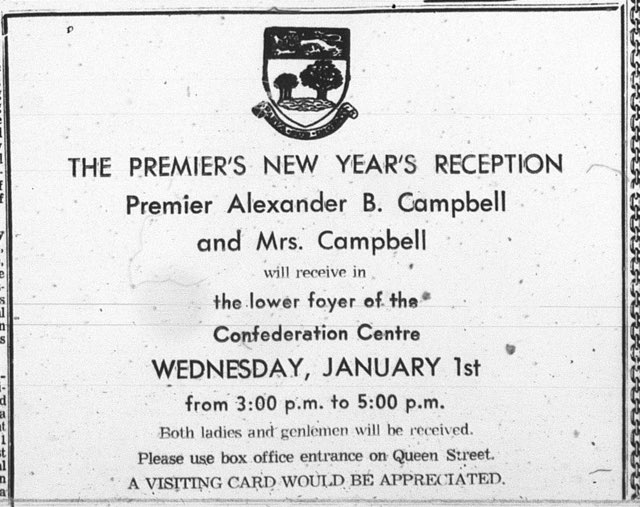
The advertisement in the newspaper for Premier Alex Campbell’s levee made a point of specifying “Both ladies and genlemen [sic] will be received,” and avoided, presumably for reasons of not limiting women, the term “levee” altogether in favour of “receiption”:
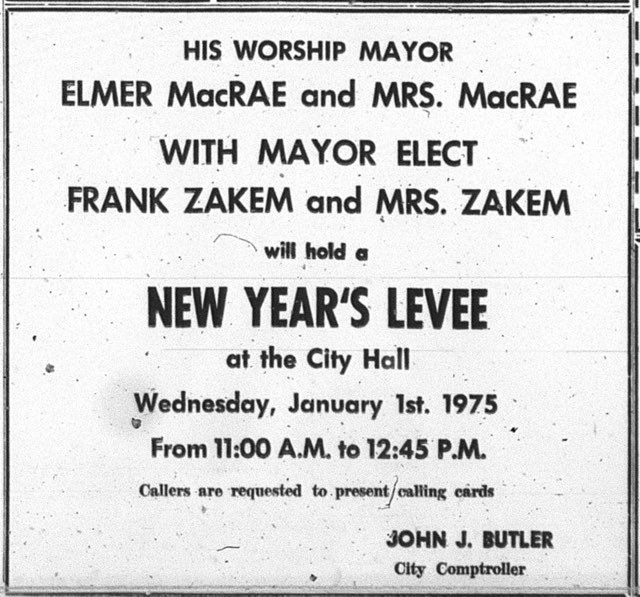
Meanwhile, while not specifically excluding women, neither the Mayor nor the Lieutenant Government specifically welcomed women either:
Another reminder that all are welcome at all levees, 40 years on from 1975. Find the schedule for 2015 here and I’ll see you there.
Wade MacLauchlan reports in his biography of Alex B. Campbell that January 1, 1975 – 40 years ago next week – was the first occasion that women were permitted to attend the Lieutenant Governor’s levee, and only grudgingly at that:
One of the most visible changes came on January 1, 1975. The United Nations’ International Women’s Year was ushered in on PEI with women participating in the traditional lieutenant-governor’s levee at Government House for the first time. This came about in a way that was typical of many of the breakthroughs made by women during the period. Lieutenant-Governor Gordon Bennett had only been in office a few weeks, and had initially indicated in response to media queries that there would be no change in the format of the levee for 1975, meaning that it would be “men only.” The justification offered was that “the mechanics of Government House and the limited time for the reception” made it impossible to accommodate women, although the possibility was left open that something could be worked out in the future.
Two days later, Lieutenant-Governor Bennett issued a statement signalling that women would be permitted to attend the levee and protesting that women had never been barred from Government House, declaring “While I intend to preserve many of the well-established traditions of this office, I will not hesitate to introduce changes and adopt practices more applicable to contemporary society as time and circumstances permit.” Cabinet minister Catherine Callbeck was one of a group of twenty-five women who joined almost one thousand men at Government House on January 1. Gaining admission to the levee was symbolic. Women had been attending the premier’s New Year’s levee throughout Alex Campbell’s time in office, continuing a practice begun in the later years of Walter Shaw’s premiership.
While I don’t think celebrating this fact is in order – should we really be celebrating the fact that in my lifetime such an indefensible, sexist policy was still in place – it is an anniversary worthy of marking.
Everyone – actually everyone – is welcome at every levee that’s on my annual Charlottetown Area Levee Schedule and I encourage you to all attend on January 1, 2015.
My in-laws are visiting us, and my father-in-law is a dedicated newspaper reader, so I was prompted me to take out a subscription to The Guardian, Prince Edward Island’s newspaper of record, for the next while.
There’s no way to subscribe only to the printed newspaper: the standard $17.50/month subscription includes daily home delivery of the print newspaper along with the “e-edition” and all-you-can-eat access to the otherwise-metered website. Oddly, the price for this without the printed newspaper is exactly the same. Which doesn’t bode well for print, as it suggests that the print newspaper is deemed to be worth $0.
The first copy of the newspaper arrived this morning (impressive, given that I purchased my subscription only yesterday) and included an excellent cover story on government expenses reported by Teresa Wright and Ryan Ross. It was a good issue to start a subscription with.
Meanwhile, I decided to use my newly-unlocked access to the entire Guardian website as an opportunity to try and make it less confusing to read (I found, to my surprise, that unlocking the website with a subscription doesn’t make any of the ads, offers and extraneous elements go away).
Hence this Greasemonkey user script:
// ==UserScript==
// @name        cleanup-pei-guardian
// @namespace   peter@rukavina.net
// @include     http://www.theguardian.pe.ca/*
// @description Hides the annoying parts of The Guardian website.
// @version     1
// @require     http://ajax.googleapis.com/ajax/libs/jquery/2.1.0/jquery.min.js
// @grant       GM_addStyle
// ==/UserScript==
$('#scpc_top_banner').hide();
$('.ad-wrapper').hide();
$('#user-elements').hide();
$('#featured').hide();
$('.promospace').hide();
$('.featured-box').hide();
$('aside').hide();
$('footer').hide();
$('.slider-box').hide();
$('footer').hide();
This script, once installed in Greasemoney, has the effect of turning this:

into this:

The effect is dramatic, and reading the altered version makes me feel like I can breathe again. And it makes me feel like I’d actually like to spend some time exploring the website.
I realize the irony of this experiment, as the bulk of my living derives, directly or indirectly, from web advertising revenue that appears in ways that are often as jarring as on The Guardian. The difference, though, is that I’m paying The Guardian $17.50 and the least they could do is make the experience of reading the website slightly less annoying.
It’s worth remembering that The Guardian has more than 100 years of a history of using design non-annoyingly; witness the front page of the print newspaper from today’s date in 1939:

It is a thing of beauty.
I spent the afternoon printing a new round of gift certificates for Casa Mia Café, to feed the demand for the holidays. They’ll be on sale as soon as the ink is dry.
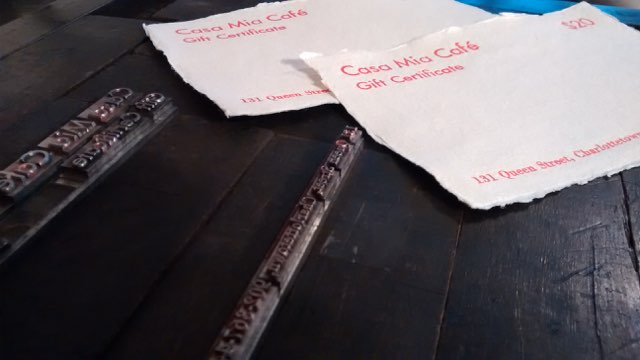
They are printed on Indian cotton rag paper from Khadi Papers on my now-99-year-old Golding Jobber № 8 letterpress in Futura 30 pt. and 24 pt. and Bodini 14 pt. They’re available in $20 and $50 denominations.
I have become diverted by an interest in the history of time on Prince Edward Island. To this end, ably aided by Simon Lloyd at Robertson Library, I have begun to explore the relevant legislation.
Here, for example, is a snippet from The Interpretation Act of 1939:
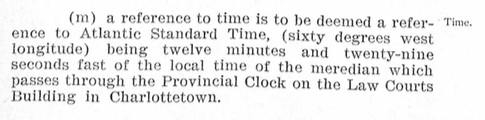
Let’s do some checking on the math.
There are 360 degrees of longitude, and 24 hours in a day, so each degree of longitude represents 4 minutes of time.
That means the a difference in time of 12 minutes and 29 seconds, which is the figure in the Act for the difference between the Provincial Clock in Charlottetown and 60 degrees west, would be 3.125 degrees of longitude.
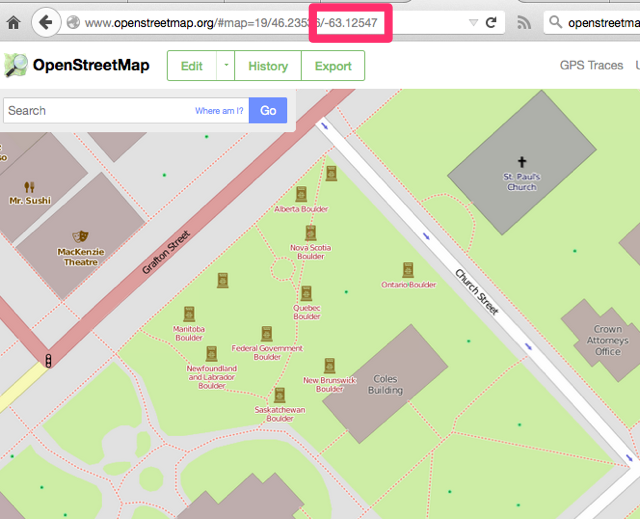
Which, in theory, places the Provincial Clock at 63.125 degrees west.
And, sure enough, if I go to OpenStreetMap.org and navigate to the Coles Building – the contemporary name for the Law Courts Building – it is, indeed, at -63.125º.
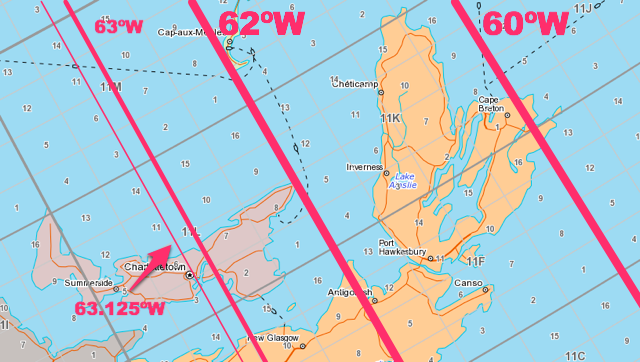
You can see this better-illustrated on the Atlas of Canada, with the NTS grid (National Topographic System) turned on. The major divisions on the NTS grid are spaced at 2º of longitude apart, and the minor divisions are spaced at 0.5º of longitude, so moving 3.125º east of Charlottetown you reach 60º west, which runs through the tip of Cape Breton:
Another approach to this would be to compare the time of the sunrise in Charlottetown to the time of the sunrise in Glace Bay, Nova Scotia (which sits almost right on top of the 60th meridian). And sure enough, the sun rose in Glace Bay this morning at 7:36 a.m. and in here in Charlottetown at 7:49 a.m., 13 minutes later.
Or, like The Interpretation Act says, 12 minutes and 29 seconds later.
The time in the Atlantic Time Zone is based on the time at the 60th meridian, which is interesting to note because that meridian runs along the very eastern side of the time zone’s boundaries. This means that although they are in the same time zone, though the sun rose today at 7:36 a.m. in Glace Bay, it didn’t rise until almost a half hour later, at 8:14 a.m., in Edmundston, NB.
My colleagues at Robertson Library have been hard at work in recent weeks publishing the audiobook and ebook versions of the Alex B. Campbell biography by Wade MacLauchlan.
Librarians are nothing if not keen to innovate, and so among the various ways you can buy the audiobook is pre-loaded on its very own MP3 player.
It’s Alex Campbell, in a tiny plastic box:
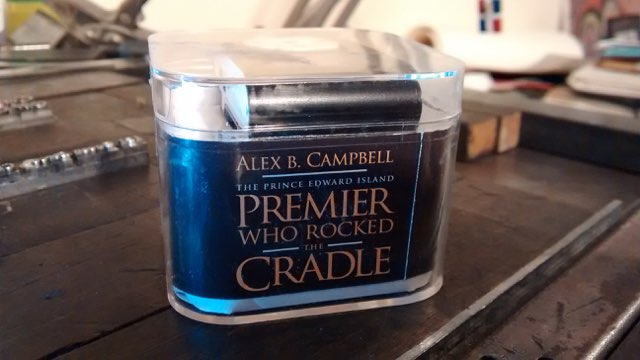
If you’re looking for a more conventional audiobook format, the book is available as a download, on a USB stick, and in a massive CD set.
My small contribution to the effort has been to work to put the ebook and audiobook on sale in iTunes, on Google Play and on Audible. This has turned out to be akin to opening a hornet’s nest full of complicated paperwork and technical requirements, so it’s slow-going. It has born some fruit, however: you can now purchase the eBook from Google Play. Others to follow.
I’m coming up on the end of a 14 year program of resuscitating the old metal window blinds that were in our house when we bought it in 2000. They’re generally in good shape structurally, but the cords have been chewed up by time, and so they need to be taken apart, the old cord extracted, new cord wound through, and new “blind cones” stuck on the end of the cord that hands down and allows them to be raised and lowered.
Which is how [[Oliver]] and I ended up roaming up and down aisle 17 and aisle 18 at the new Canadian Tire store in Charlottetown, where we were directly by comically unhelpful staff, looking for cord and cones.
I was looking for 1/8” cotton cord, but they had none, so I had to settle for nylon. That’s fine.
As to blind cones, none were evident, and, returning to other members of the comically unhelpful staff for additional help, the reaction was close to indignation that anyone would ask for directions to such an unusual product: “I know we don’t sell blinds… you could try aisle 18.” Where we’d just been roaming. We left the store.
What to do?
Fortunately, at this exact moment I remembered that there is a Ditto 3D printer sitting here in the office, on loan from Robertson Library at the University of PEI for a “Minecraft Party” at Birchwood Intermediate School on Monday afternoon where we’ll use it to take Printcraft out for a ride.
So why not, I reasoned to myself, simply fabricate my own blind cones, Canadian Tire be damned.
And so that’s what we did.
Thingiverse to the rescue: we found a ready-to-print Window Blinds Pull Cone, free for the taking. We grabbed the STL file, ran it through Tinkerine Suite (the software used to “slice” the STL file and make it ready for sending to the Ditto 3D printer) and copied the object 3 times so we could print 4 cones at once. We copied the resulting “.g” file to an SD card, slid the SD card into the printer, hit “print” and we were off.
And the result, 37 minutes later:
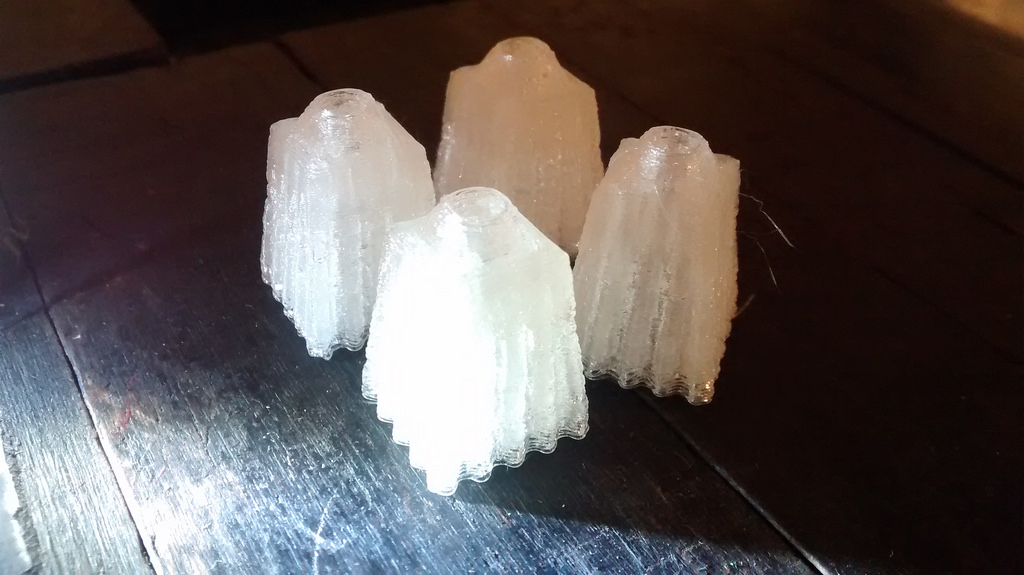
Score one for the awesome power of personal fabrication!
In my last post I documented the process of getting Node-RED up and running on a Raspberry Pi. In this post I’m going to provide complete instructions for getting a Grid Insight Ledbetter Board, which can read electricity and water meters, set up and running with a Raspberry Pi and Node-RED, uploading meter readings to a remote server.
1. Get a Raspberry Pi
There are all sort of places to get a Raspberry Pi, and any Raspberry Pi will do. But a good kit to buy, which includes everything you need, is the Cana Kit Ultimate, which, at this writing, sells for $89.00 CDN and includes the Pi, a power supply, a wifi dongle, HDMI cable, a breadboard, ribbon cable and T-connector for wiring up the Ledbetter board, and a nice plastic case.
2. Set up the Raspberry Pi
It’s easiest to get up and running if you have an HDMI-capable display, USB keyboard and mouse to connect to the Pi, as well as a wired Ethernet connection to the Internet, at least until you get it set up for wifi.
Plug the ribbon cable into the GPIO slot so that you’re ready to install the Ledbetter Board on the breadboard in a later step.
Insert the SD card into the Pi, connect the HDMI cable, the Ethernet cable, the keyboard and the mouse, and then connect the power supply.
When prompted, install the “Wheezy” distribution from the NOOBS installer.
Once this is installed, and the Pi has rebooted after installation, you’ll end up at the Linux command line, where you can then install a curses-based wifi configuration tool:
sudo apt-get install wicd-curses
You can also set the password for the “pi” user, the time zone and the hostname by running:
sudo raspi-config
Once you’ve done all that, and rebooted the Pi, you can set up wifi with:
wicd-curses
You’ll see a list of wifi SSIDs: find yours and cursor down to it and then cursor-right to set up the wifi password and any other options; be sure to check “Automatically connect to this network” so that this network is connected to automatically every time the Pi reboots. Press F10 to save your settings, then ENTER to connect to the wireless network. The result should look something like this, with your new IP address displayed at the button of the screen:
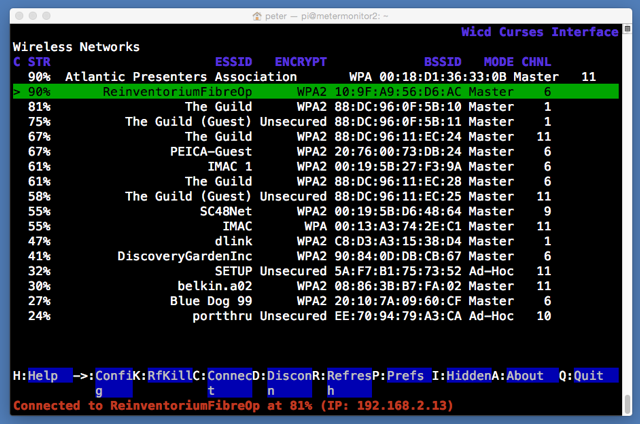
Take note of the IP address your Pi was assigned (mine was 192.168.2.13), and then, from another terminal on the same network (i.e. your laptop or desktop connected to the same wireless network):
ssh -l pi 192.168.2.13
(where you substitute the IP address you were assigned for the 192.168.2.13). You’ll be prompted for the password for the “pi” user: enter the value you selected earlier.
I found the wifi to be more reliable when I modified the power-saving settings:
sudo nano /etc/modprobe.d/8192cu.conf
and paste in:
# Disable power saving
options 8192cu rtw_power_mgnt=0 rtw_enusbss=1 rtw_ips_mode=1
I also found that I needed to disable the ability to login to the Pi via the serial port to get the GPIO connection to the Ledbetter Board working:
sudo nano /etc/inittab
and then comment out the line:
T0:23:respawn:/sbin/getty -L ttyAMA0 115200 vt100
3. Install Node-RED
From the command line of your Pi, once you’ve done all of the above and are logged in, you’re ready to install Node-RED:
wget http://node-arm.herokuapp.com/node_latest_armhf.deb
sudo dpkg -i node_latest_armhf.deb
wget https://github.com/node-red/node-red/archive/0.9.1.zip
unzip 0.9.1.zip
mv node-red-0.9.1 node-red
cd node-red/
npm install --production
The last step will take a while to complete; be patient.
Next install the serial port node for Node-RED:
npm install serialport
And then configure Node-RED to automatically start on bootup:
wget https://gist.githubusercontent.com/Belphemur/cf91100f81f2b37b3e94/raw/72e9a7e779ae343121ce535e312a9872fc9d5fb6/node-red -O /etc/init.d/node-red
sudo chmod +x /etc/init.d/node-red
sudo update-rc.d node-red defaults
Finally, reboot the Pi so that all of the settings take effect:
sudo reboot
4. Install the Node-RED Workflow
Once the Pi has rebooted, you should be able to visit this address in a web browser on a device connected to the same wireless network (substitute the IP address of your Pi for the 192.168.2.13):
http://192.168.2.13:1880
Click on the “hamburger” icon in the top-right of the display, select Import and then Clipboard and paste in the following, substituting the path to a remote REST interface URL for PATH-TO-WEBSERVER-SCRIPT. Place the workflow on the Node-RED canvas with a click, and click DEPLOY to save the workflow.
[
   {
      "id":"e046421c.7b0da",
      "type":"serial-port",
      "serialport":"/dev/ttyAMA0",
      "serialbaud":"9600",
      "databits":"8",
      "parity":"none",
      "stopbits":"1",
      "newline":"\\n",
      "bin":"false",
      "out":"char",
      "addchar":"false"
   },
   {
      "id":"b0910fee.8b01a",
      "type":"csv",
      "name":"parse scm messages",
      "sep":",",
      "hdrin":"",
      "hdrout":"",
      "multi":"one",
      "ret":"\\n",
      "temp":"messagetype,serialnumber,reading,metertype,tampercode,signalstrength",
      "x":500,
      "y":460,
      "z":"5d86b745.52bdc8",
      "wires":[
         [
            "544f7094.a3211"
         ]
      ]
   },
   {
      "id":"544f7094.a3211",
      "type":"function",
      "name":"make url for posting to database",
      "func":"msg.url = \"https://PATH-TO-WEBSERVER-SCRIPT\";\nmsg.url += \"?serialnumber=\" + msg.payload.serialnumber;\nmsg.url += \"&metertype=\" + msg.payload.metertype;\nmsg.url += \"&reading=\" + msg.payload.reading;\nreturn msg;\n",
      "outputs":1,
      "x":638,
      "y":613,
      "z":"5d86b745.52bdc8",
      "wires":[
         [
            "1683d875.a08e3"
         ]
      ]
   },
   {
      "id":"17af58a5.200097",
      "type":"switch",
      "name":"route on message type",
      "property":"payload",
      "rules":[
         {
            "t":"cont",
            "v":"UMSCM"
         },
         {
            "t":"cont",
            "v":"UMIDM"
         }
      ],
      "checkall":"false",
      "outputs":2,
      "x":493,
      "y":363,
      "z":"5d86b745.52bdc8",
      "wires":[
         [
            "b0910fee.8b01a"
         ],
         [

         ]
      ]
   },
   {
      "id":"1683d875.a08e3",
      "type":"http request",
      "name":"post to remote mysql database",
      "method":"GET",
      "url":"PATH-TO-WEBSERVER-SCRIPT",
      "x":618,
      "y":722,
      "z":"5d86b745.52bdc8",
      "wires":[
         [

         ]
      ]
   },
   {
      "id":"8622d22d.68ea8",
      "type":"serial in",
      "name":"Ledbetter Board",
      "serial":"e046421c.7b0da",
      "x":291,
      "y":261,
      "z":"5d86b745.52bdc8",
      "wires":[
         [
            "17af58a5.200097",
            "b262de18.43cc38"
         ]
      ]
   },
   {
      "id":"b262de18.43cc38",
      "type":"debug",
      "name":"",
      "active":true,
      "console":"false",
      "complete":"false",
      "x":604,
      "y":212,
      "z":"5d86b745.52bdc8",
      "wires":[

      ]
   }
]
Here’s a little PHP script that you can use as an starting point for your own archiving of data to a MySQL database:
<?php

if ($_GET) {

    $db = new mysqli("HOST", "USER", "PASSWORD", "DATABASE");

    /* check connection */
    if ($db->connect_errno) {
        printf("Connect failed: %s\n", $db->connect_error);
        exit();
    }

	$query = sprintf("INSERT into readings (serialnumber,datestamp,metertype,reading) values ('%s','%s','%s','%s')",
				mysqli_real_escape_string($db,$_GET['serialnumber']),
				strftime("%Y-%m-%d %H:%M:%S"),
				mysqli_real_escape_string($db,$_GET['metertype']),
				mysqli_real_escape_string($db,$_GET['reading']));

	if (mysqli_query($db, $query) === TRUE) {
		header("HTTP/1.1 201 OK");
	}
	else {
		printf("INSERT failed: %s\n", $db->connect_error);
		exit();
	}
}
5. Set up the Ledbetter Board
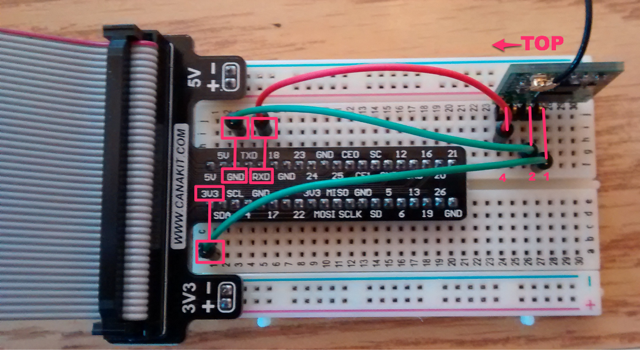
Plug your GPIO ribbon cable adapter into your breadboard as in the photo below.
Snap the pigtail connector for the antenna into the Ledbetter Board, and the slide the board into the breadboard, noting which side is “up” (you can tell by reading the label screen-printed onto the board)
The Ledbetter Board has 4 pins, only 3 of which are used: you need to wired up:
- Pin 1 on the Ledbetter connects to the 3V3 power pin on the Pi
- Pin 2 on the Ledbetter connects to GND (ground) on the Pi
- Pin 4 on the Ledbetter connects to RXD on the Pi
Here’s what my setup looks like when it’s wired up:
6. Watch it Work
Power off the Pi from the terminal:
sudo shutdown now
Then plug the ribbon cable from the Pi into the breadboard connector, and power the Pi back on.
Visit Node-RED in your web browser as above, and click on the Debug tab in your workflow, and you should start to see SCM messages flowing in:
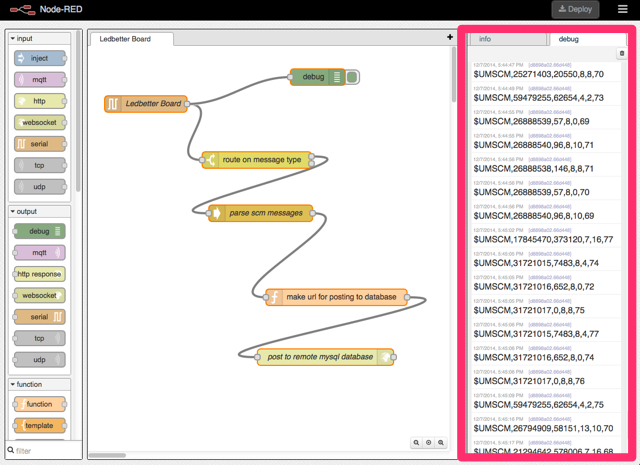
You should also see your database back end filling up with reports.
Troubleshooting
There are many moving parts in this setup, so many opportunities for things that could go slightly wrong. Things that went wrong for me in my various setups that you might want to check:
- Are the proper Ledbetter Board pins wired to the proper GPIO pins? Make sure you’ve got “top” and “bottom” on the board properly oriented: the “top” is the side that has “Ledbetter Board” stencilled on it.
- Are you lined up with the proper GPIO pins on the breadboard?
- Check the “Debug” window in Node-RED: errors in the workflow nodes might be causing problems. Especially check your server-side script to see if it’s receiving messages properly and without generating errors.
About This Blog
 I am Peter Rukavina and this is my blog. I am a writer, letterpress printer, and a curious person.
To learn more about me, read my /now, look at my bio, listen to audio I’ve posted, read presentations and speeches I’ve written, or get in touch (peter@rukavina.net is the quickest way).
I have been writing here since May 1999: you can explore the 25+ years of blog posts in the archive.
You can subscribe to an RSS feed of posts, an RSS feed of comments, or a podcast RSS feed that just contains audio posts. You can also receive a daily digests of posts by email.