It’s now been three months since I decamped from the social media fields and stopped pushing notice of blog posts here to Twitter, Facebook et al.

Facebook was an easy drug to kick; Twitter was harder: for weeks, my phantom tweeting limb would conjure fully-formed witty ripostes. But I got over that too, in part by refocusing my writerly energies here on the blog.

What continues to happen, though, is that I run into friends and family, used to getting a ping from Twitter or Facebook about new blog posts; they simply assume I’ve stopped blogging (or died).

I’ve almost fallen off the wagon a few times as a result: “I’ll just push notices to Facebook and Twitter, but I’ll ignore them otherwise.” But I’ve resisted. Pringles in the top cupboard are still Pringles.

All is not unrosy, however: one of the delightful side-effects of the new world order is that I regularly get comments, corrections and cautions, in reaction to posts, from my friend Dave.

Dave, you see, has an unusual (read, “different from mine”) daily schedule that, if memory serves, sees him rising daily at 4:00 a.m., feeding the chickens, writing several young adult novels, chopping a cord of wood, and running 10 miles, all before breakfast.

But Dave subscribes to the blog by email–just like you can–and so in there somewhere he reads the previous day’s posts. And where, in an earlier day, he would have simply hit “Like”, or polished off an “attaboy” (or “what hell!?”) tweet, Dave will now send me carefully-worded emails when something strikes a chord.

This very fact alone is enough to make the decamping worth it.

So perhaps you’d like to join Dave?

You don’t have to write me carefully-worded emails. But you’ll be free from the need to ever remember again “oh, right, Peter has a blog.”

Click here to get it all started.

(You’ll get one email a day, maximum)

🗓️
Weblogs  •  Email

Swedish friend Karl needs a stencil to allow him to paint or stain the letters PJODD on stylish wooden boxes that will hold mesh wireless routers. Through the intercontinental grapevine, he heard of my 3D printing toe-dipping, and sent me a note looking for guidance. I eagerly agreed to see what I could do to help (in part, of course, because the wireless mesh he’s helping to seed is one that I will be able to connect to on my next visit to Malmö).

So here’s what I did.

First, I found a stencil font, called Gunplay, that I could use to render the letters PJODD digitally in a way that wouldn’t leave any stray “inside bits” that would fall off a 3D object.

I installed the font on my Mac, and then used Inkscape, an open source illustration tool, to render the type:
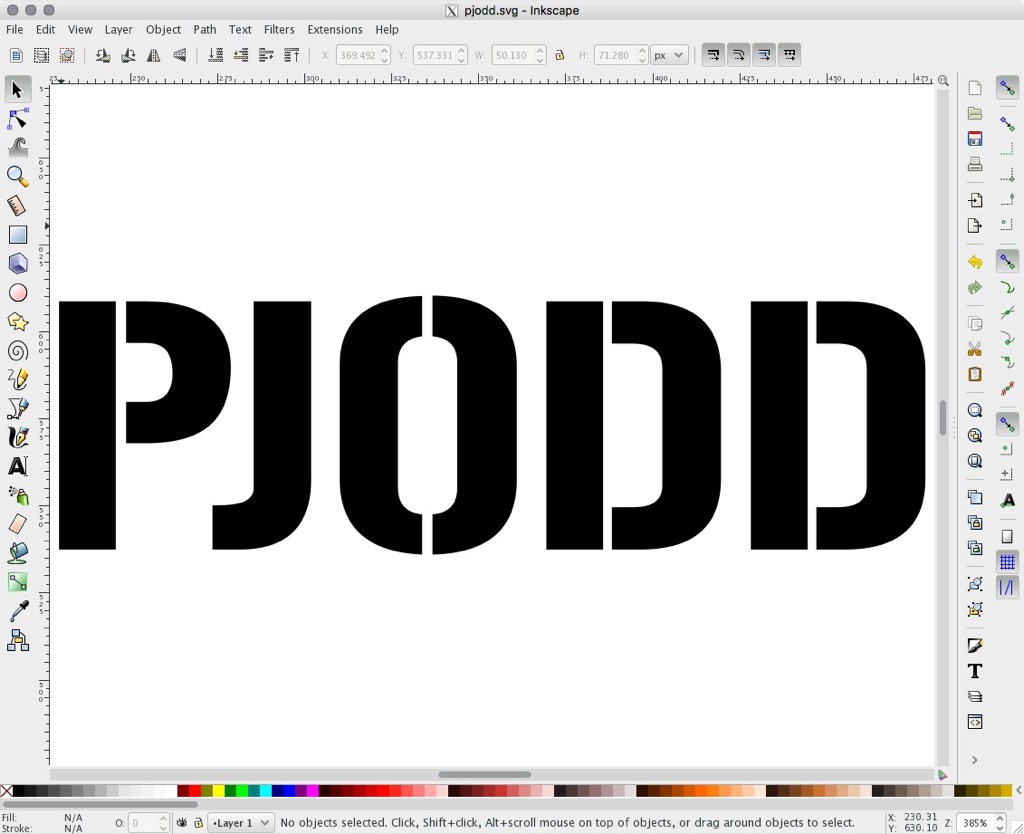
PJODD rendered in Inkscape

Before saving this as an SVG file, I selected the text and converted it to a path with Path > Object to Path from the menu.

Then I saved the file, and the result was pjodd,svg.

Next, I went to Tinkercad.com and created a new design; I dragged a box onto the canvas, and made it 8cm by 5cm, which is the size Karl said would work best. I adjusted the depth of the box to be 1.2mm high, which seemed about right for a stencil.
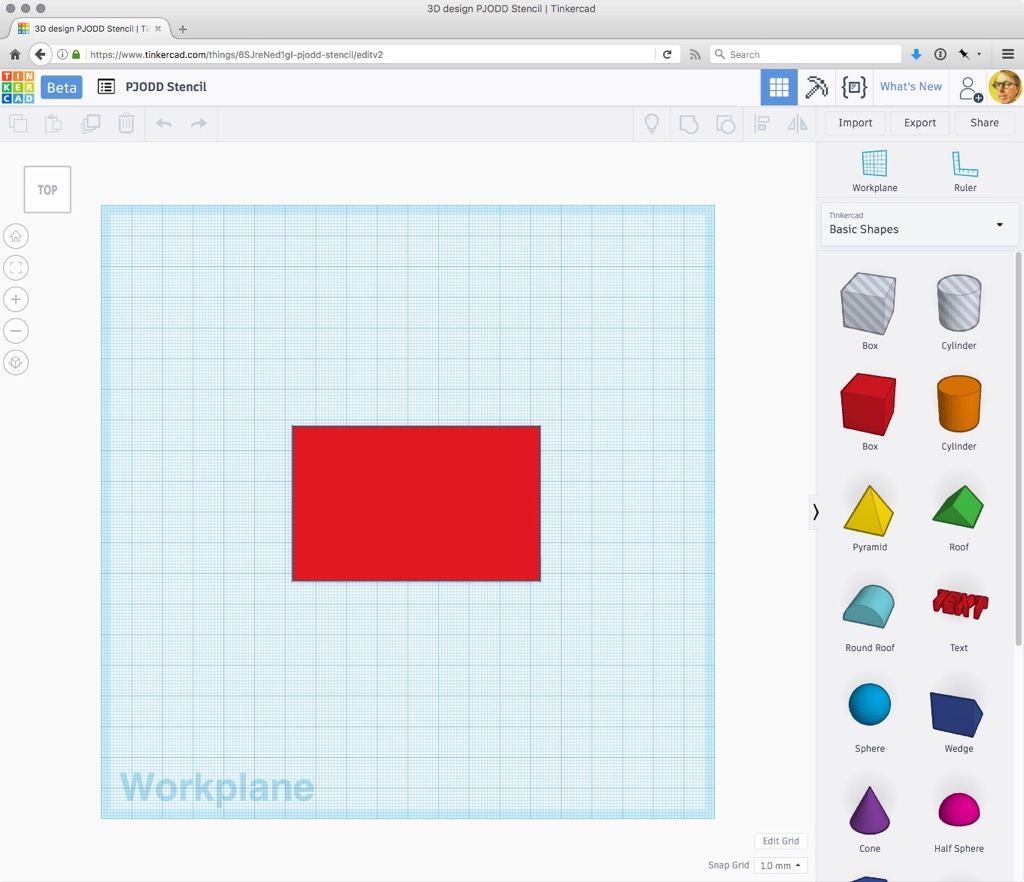
8cm by 5cm box in Tinkercad

Next, I imported the SVG file with the text PJODD into the canvas, and sized it to fit within the 8cm by 5cm box, and to be the same 1.25 mm high:
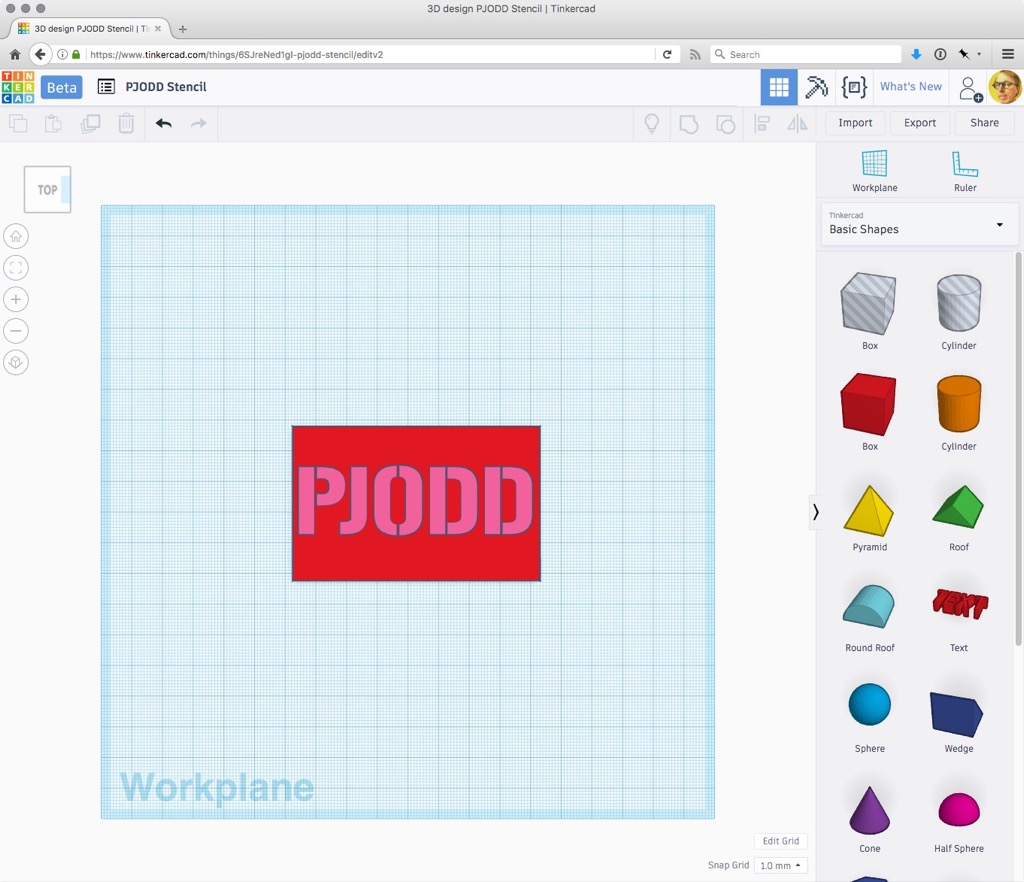
PJODD imported into Tinkercad

I selected the PJODD object, and converted it from being solid to being a hole, and then grouped it with the box to “cut a hole” in the box.
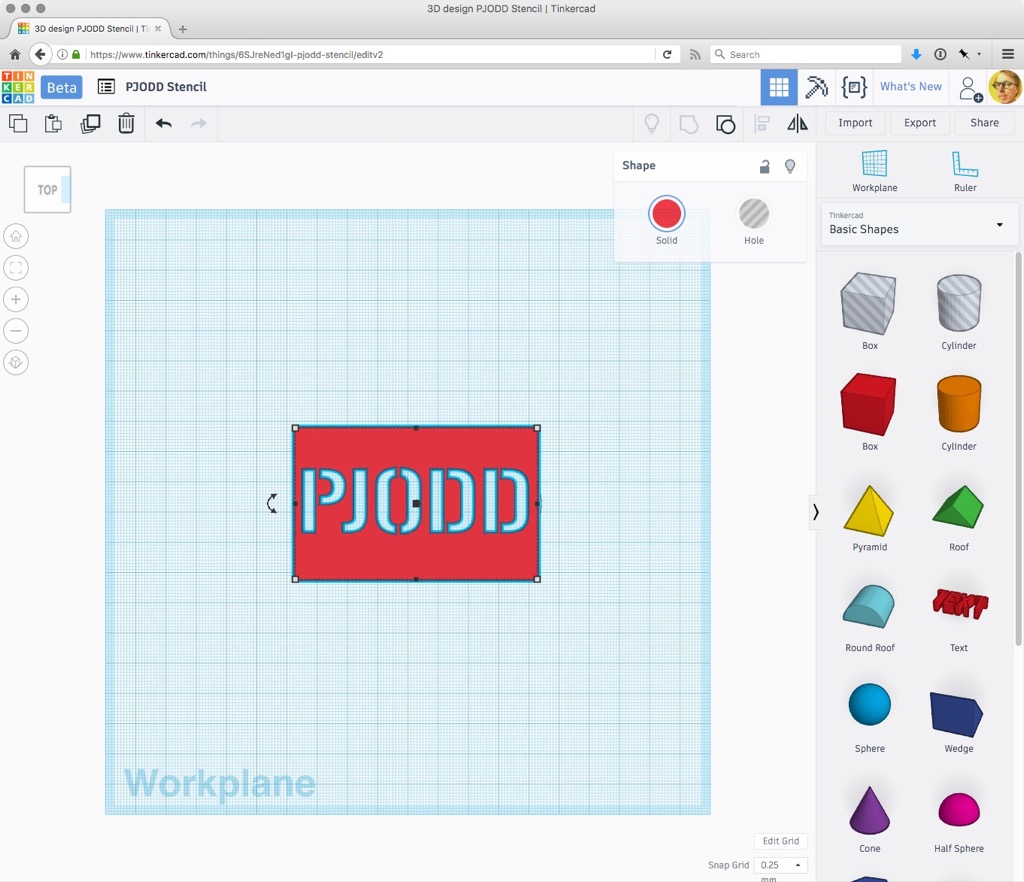
PJODD combined with the box in Tinkercad

I realized it made more sense to have the PJODD at the top of the block, to allow me to build in a handle to allow it to be easily placed and held, so I used the undo feature of Tinkercad to go back a few steps, re-positioned the PJODD, and re-grouped, to produce this:
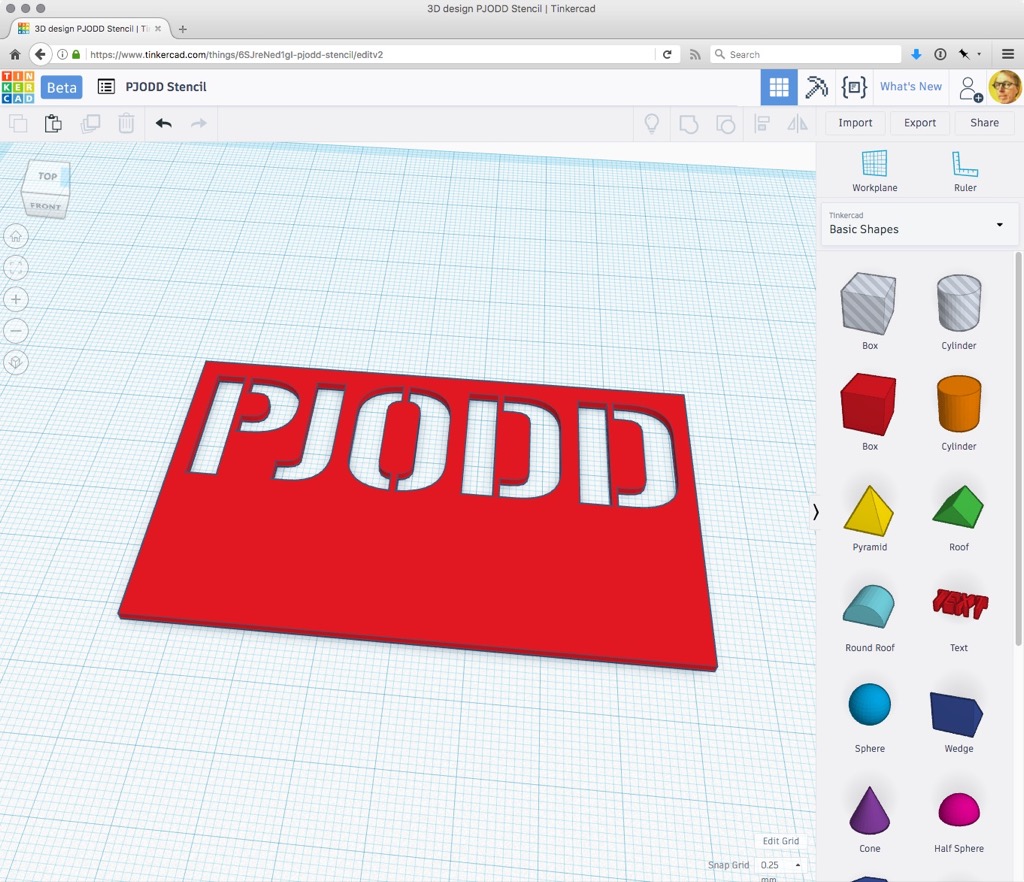
Moved PJODD

I added a box for a handle, and then used a half-sphere, rotated 90 degrees and turned into a hole, to create a divot to make it easier to hold:
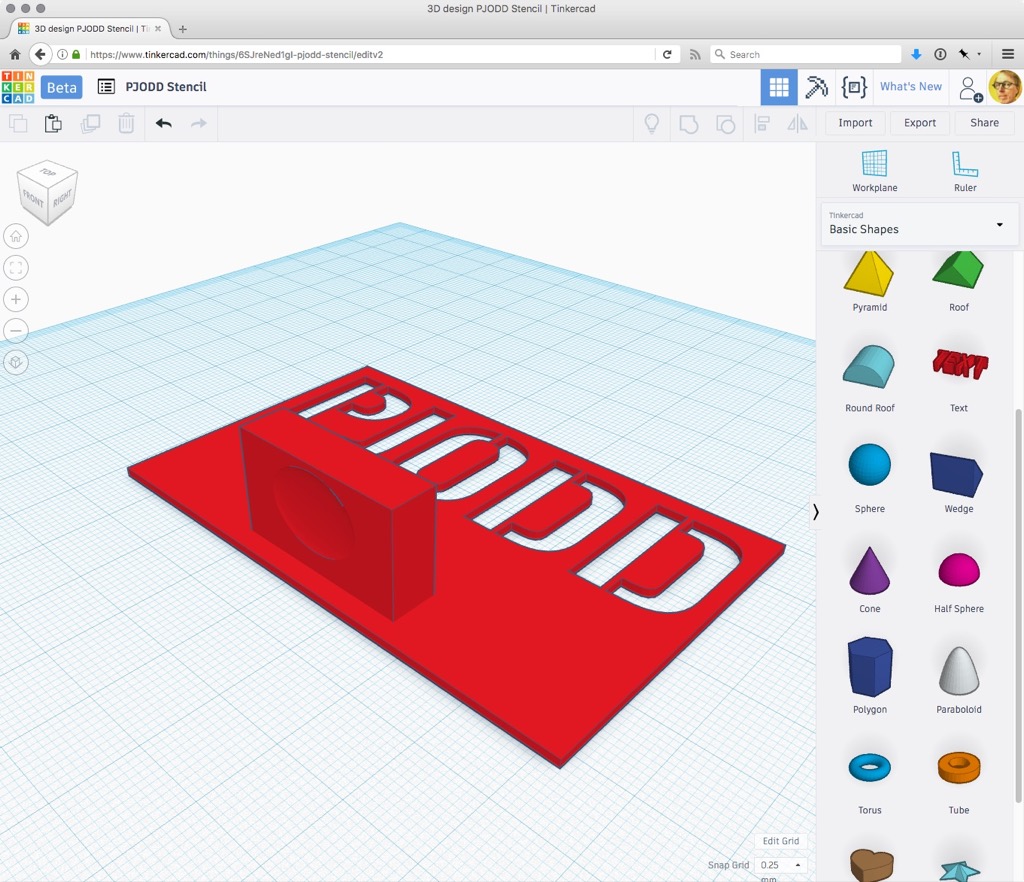
The handle on the stencil

Here’s the finished object, ready for tinkering by others, in Tinkercad.

With everything set as I liked, I exported the object from Tinkercad as an STL file, pjodd.stl, and loaded this into Cura for slicing:
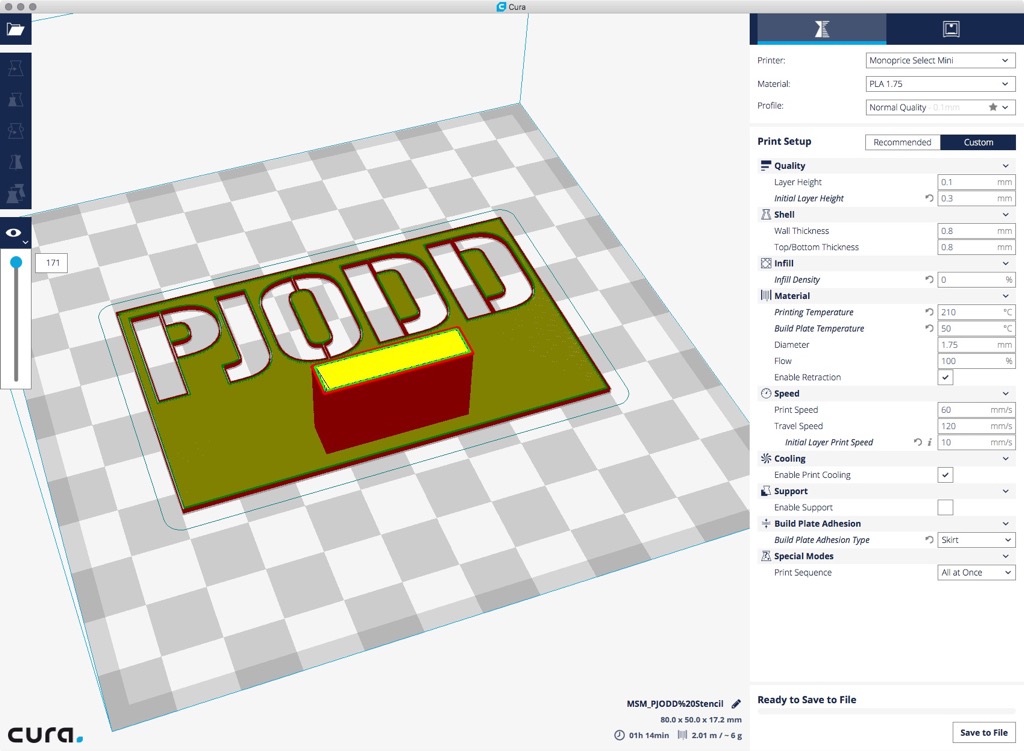
PJODD in Cura

I adjusted a few of the settings in Cura–selected a “skirt” instead of a “brim” or “raft”–and then exported as a G-code file, pjodd.gcode.

I set the file to print on my Monoprice Select Mini; starting out it looked like this:
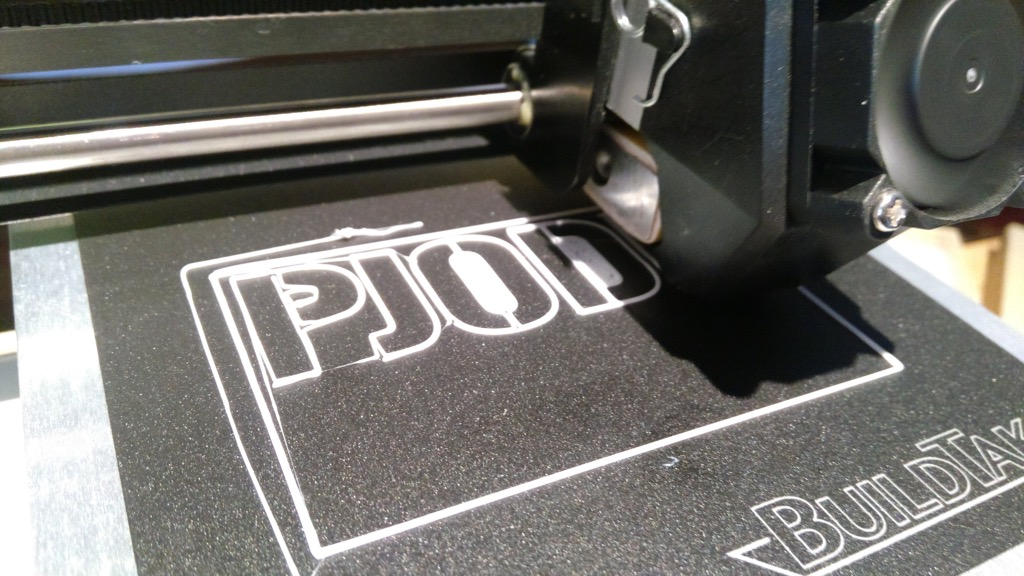
PJODD printing on 3D printer

When it was finished, 90 minutes later, it looked like this:
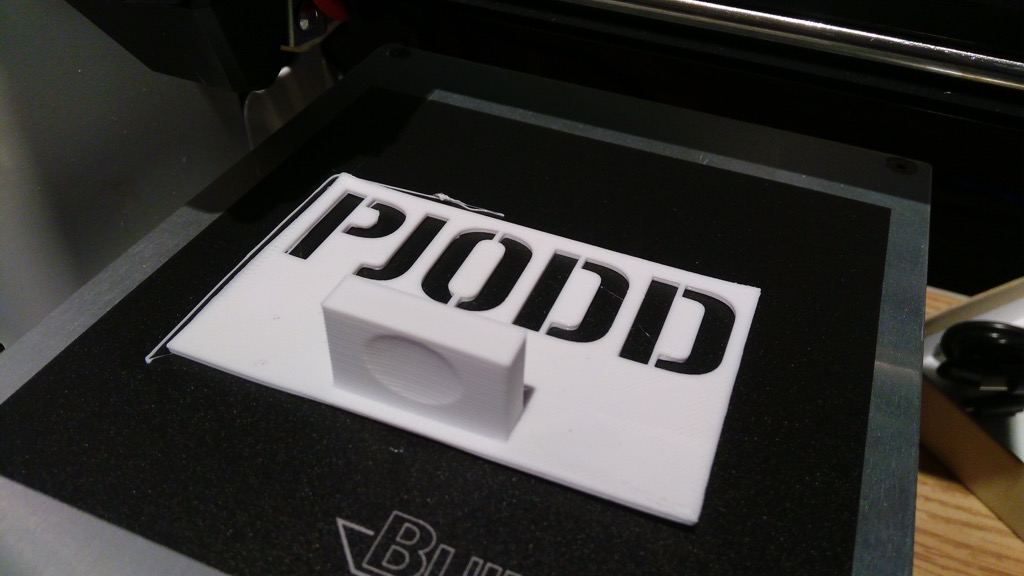
PJODD printing finished

It’s hard to see in that photo, but there was some warping of the object at the edges that I may have been able to mitigate if I’d printed a “raft” underneath.

You get a better sense of its “stencilness” in profile:
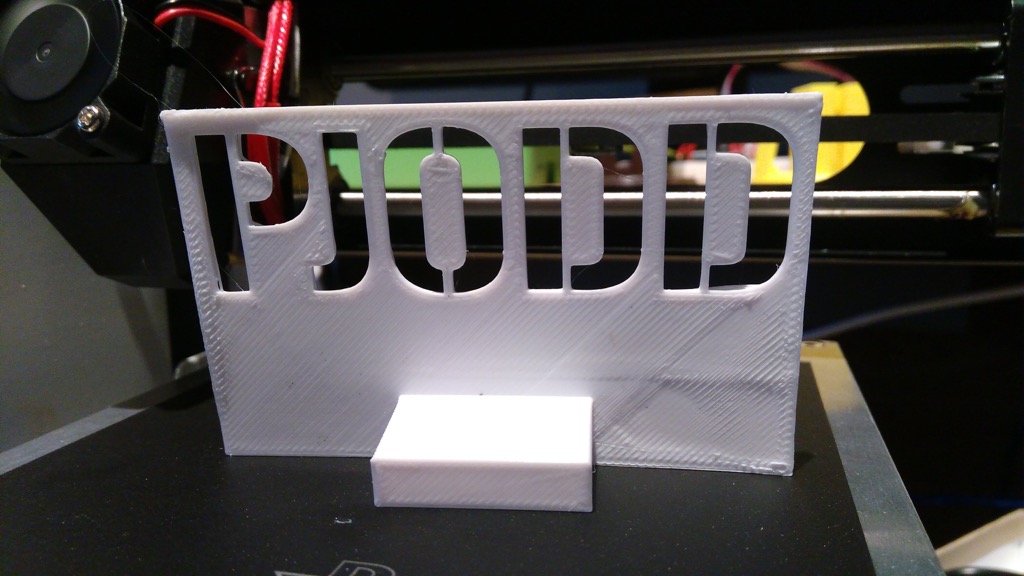
PJODD Stencil

What good is a stencil if you don’t try it out in the real world! So I fashioned a crude “mask” around the finished stencil to allow me to spray paint through it: I cut a hole in a piece of card stock, and masking taped the stencil to the back of it:
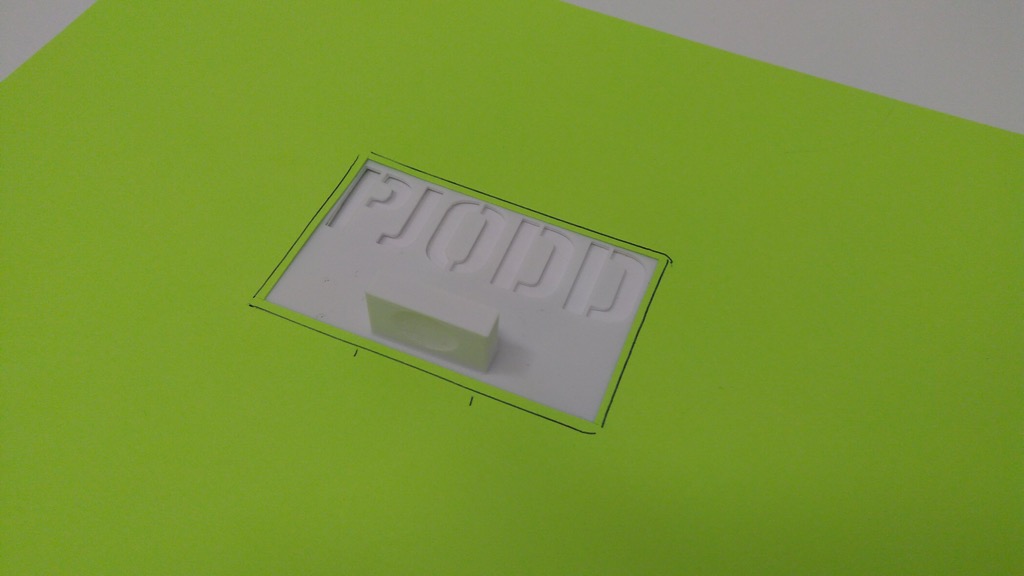
Stencil with a mask around it

I dug some spray paint out of the bowels of The Guild and gave it a go, spraying lightly across with 2 passes from a height of about 6 inches:
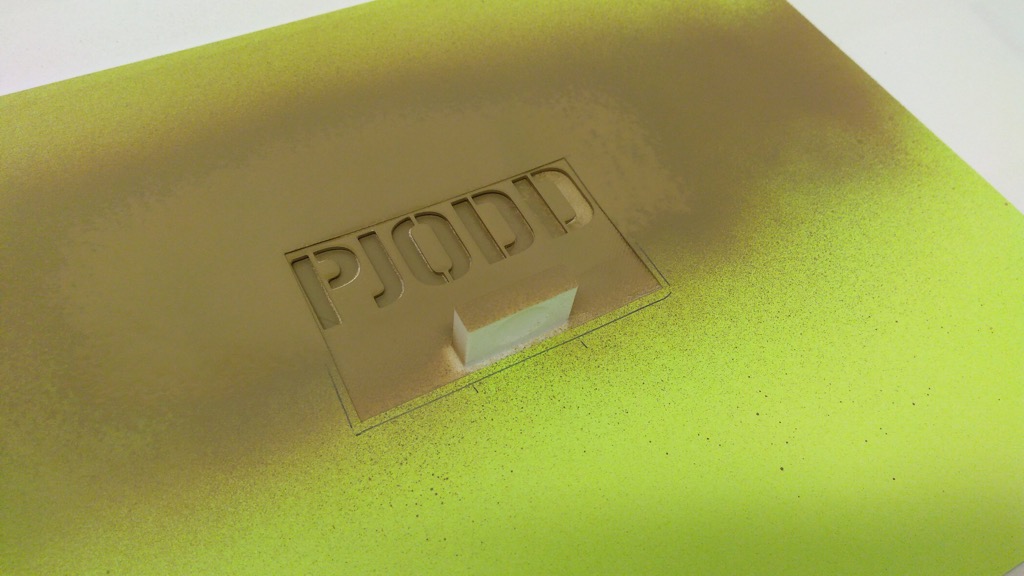
Stencil and paint

The result was not entirely unpleasing:
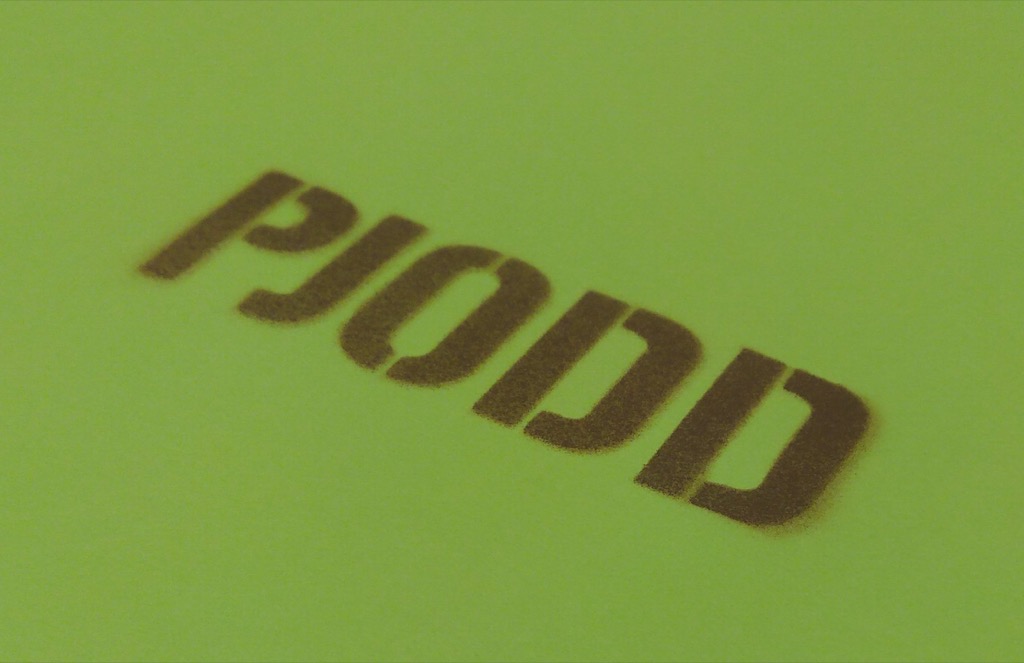
The result

So I think we can call that at least a partial win.

Some things I’d do differently:

  1. The stencil doesn’t actually need to be as thick as it is; I’d say that I could print it 1/2 to 3/4 as thick and it would still hold together and stand up to multiple uses.
  2. I’d print the “base” around the stencil about 1cm larger in all directions to allow it to be more easily masked with tape on a paper base.
  3. I’d print a “raft” under the object on the 3D printer (this is a setting in Cura) to mitigate the warping; this would allow the stencil to be more flush against the item being painted and would cut down on some of the “paint shadow.”
  4. The “handle” doesn’t need to be as substantial as it is, at least not for spray painting; it would, I think, be useful for sponge-painting through the stencil, as you’d want a way to hold it in place securely. But for spray painting, all that’s really needed is a tiny little handle to pick it up with.

That all said, I’m not entirely sure that 3D printing is the best way of creating the stencil in the first place; alternatives:

Even if 3D printing isn’t the best way to go, it did have the advantage of being something I could take from conception to testing in only a couple of hours, and I learned a lot in the process.

Karl, your move.

🗓️

Four years ago, with the help of my friend Don Moses, I designed, and then had printed on his 3D printer, a “desk hole filler”.

I went on to design a second iteration, with USB female jack, a few weeks later.

One of my reasons for wanting to acquire a 3D printer in-house is that, based on years of experience in the digital realm, I’ve found that having to go out of house for parts of the toolchain, whether it’s servers or parts or 3D printing, can be an insurmountable bottleneck. More steps slows down innovation.

So whereas Don was extremely generous with his time and printer, you can only get so far if the printer is a few miles away and dependent on someone else’s good graces.

And so, by way of iterating on this project, I decided to print a desk hole filler here on my new Monoprice Select Mini, just to get a refreshed baseline sense of the project, with an eye to modifying the design now that I can crank out new versions on a whim.

To start, I printed what amounts to exactly the same thing that Don last printed out for me, minus the USB text (which was printed backwards in any case); you can grab the model from Tinkercad if you want to play along.

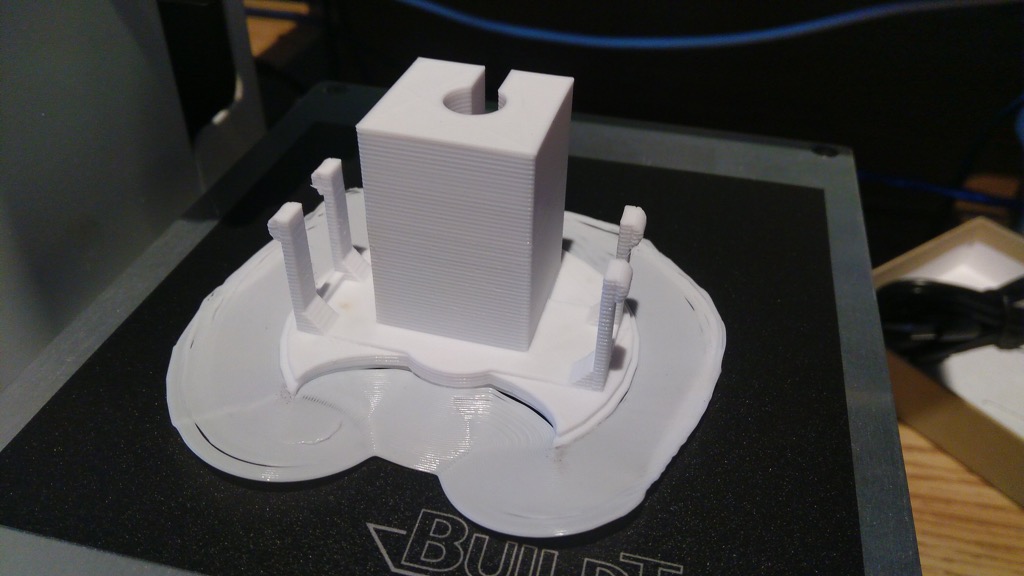
It took 2 hours and 39 minutes to print, and looked like this when it was done and before I removed the brim:

Desk Hole Filler 3.0 on the Monoprice Select Mini

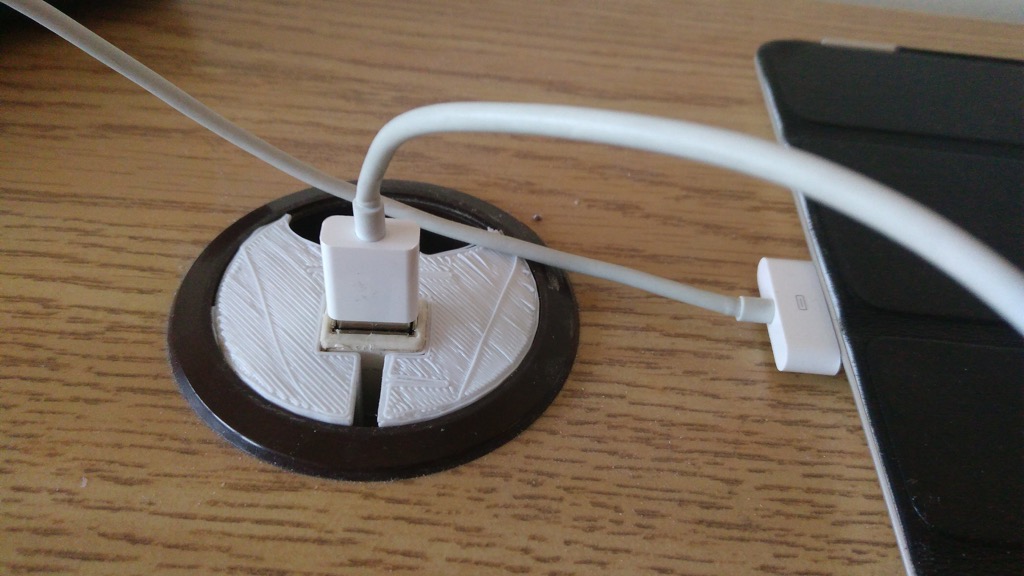
Once I’d removed it from the base, trimmed off the brim, and inserted it into my desk, it looked like this:

Desk Hole Filler in my Desk

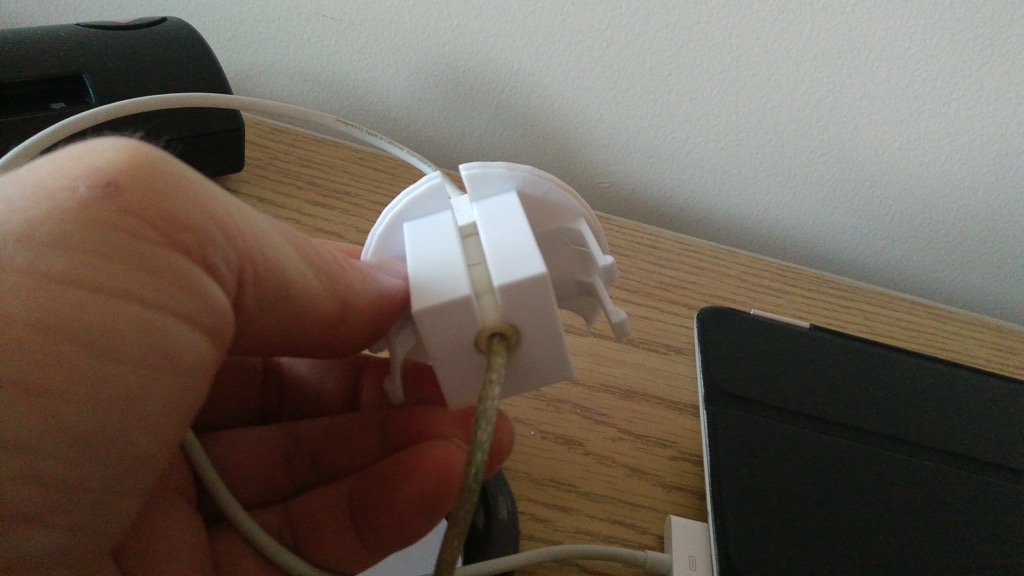
The USB female jack is the end of a USB cable that slots into the desk hole filler, runs down through the bottom of it, and then runs across the bottom of my desk and up through the opposite end where it plugs into a USB hub for power.

How the USB female jack works

Compared to the version that Don last printed for me in 2013, I think (by chance rather than skill) I got the leg “springiness” right, as they had the right amount of give on insertion, and didn’t snap off. Don’s “face” was much smoother than mine, which is all ugly and stringy and rough-looking, so I’ve got that to iterate on to start.

🗓️

From the number of times I’ve mentioned it here, from Berlin to Japan, you probably know that I’m a fan of the Japanese MUJI anti-brand.

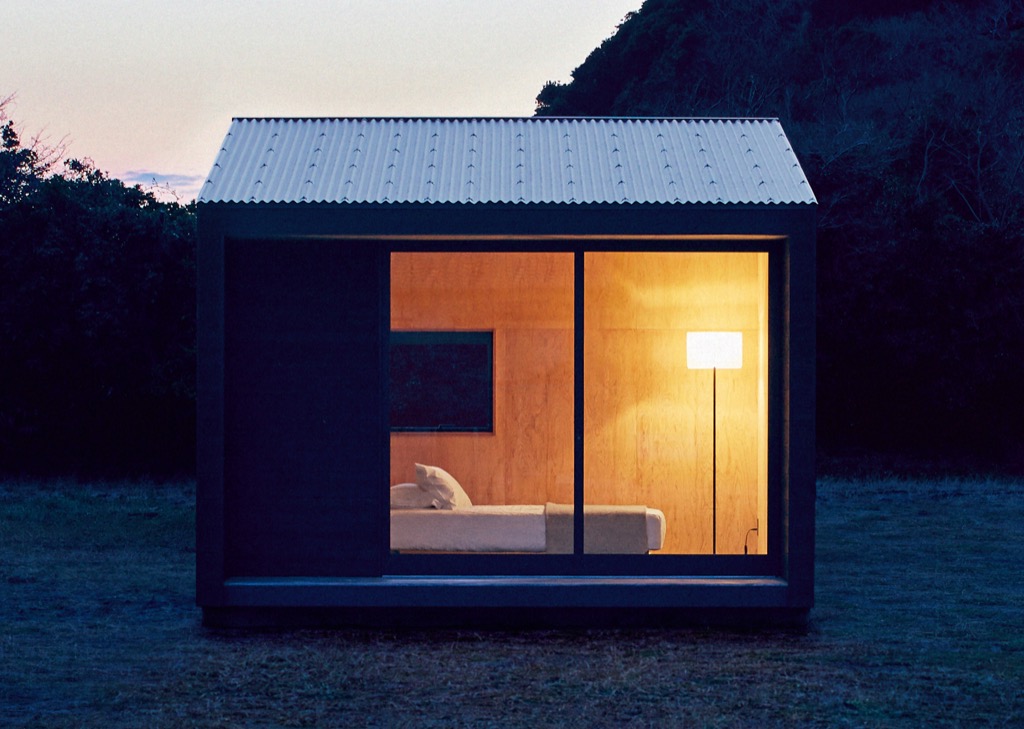
Now MUJI is in the housing business, or at least the small shelter business, with the MUJI Hut.

A very special little place, all your own—MUJI Hut

Who hasn’t dreamt of living somewhere they really want to be? The tools to make that dream a reality are now available. It’s not as dramatic as owning a house or a vacation home, but it’s not as basic as going on a trip.

Put it in the mountains, near the ocean, or in a garden, and it immediately blends in with the surroundings, inviting you to a whole new life.

This was the vision behind our radically new MUJI Hut concept.

The result is lovely:

MUJI Hut (from https://www.muji.com/jp/mujihut/en.html)

At roughly $36,000 (3 million yen), this not “affordable housing” by any measure.

But if I were to look for a way to borrow a little piece of the woods or the shore for my own, this is exactly the form factor I’d be looking for.

(via Spoon & Tamago)

🗓️
MUJI  •  Japan  •  Hut  •  Housing
Audio file

Being a sole practitioner here on the blog, I’ve no copy editor. In the early days of blogging we all wore the absence of intermediation as a badge of honour: copy editing was a relic of the old school; we were rough and ready and off the cuff.

But as I age, and my mind enfeebles, and my vanity upticks, I’m increasingly sensitive to making obvious mistakes: double words, misspelled words, mistakes in punctuation and so forth.

To try to stanch some of this, some months back I started using the text-to-speech features of my Mac to read posts back to me after I’d written them, leaving an editor window open to allow me to correct errors as I heard them; in doing so I’ve discovered that although it’s no means a skilled copy editor, my aural brain thinks differently from my reading brain, so issues I could not see I can clearly hear. It’s helped. At least a little.

Yesterday I made a discovery that made this even easier: baked right into recent versions of Firefox is a “Reader View,” and that view has a “Narrate” tool that reads the text out, and highlights words and paragraphs as it goes along. This combination is a big aid to proofreading; it looks like this when turned on for this post:

Screenshot of Firefox Reader View

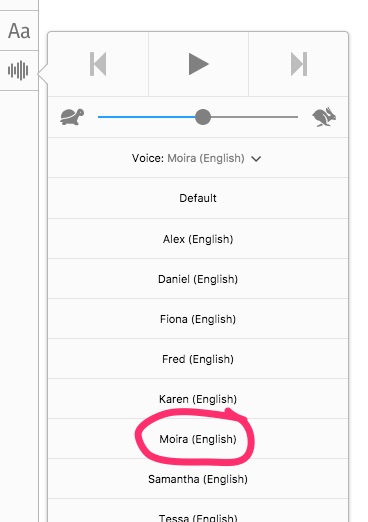
What really clinched it for me, however, was switching the voice for the narration from the default to Moira:

Screen shot of voice selection in Reader View in Firefox

Moira speaks with an Irish accent (you can hear her reading by listening to the sound attached above), which means both that she’s more likely than not to pronounce things as they are meant to be said (she does an excellent job at MacLauchlan, which the default voice just can’t wrap its mouth around, for example). And, more importantly for proofreading purposes, Moira’s voice plays to a different part of my brain yet again, allowing me to hear errors I could neither see nor hear if read in a voice closer to my own.

I’m still as prone to making errors as I’ve ever been, but with Moira’s help at least I have some help in finding them before you do.

🗓️
Firefox  •  Reader View  •  Text to Speech

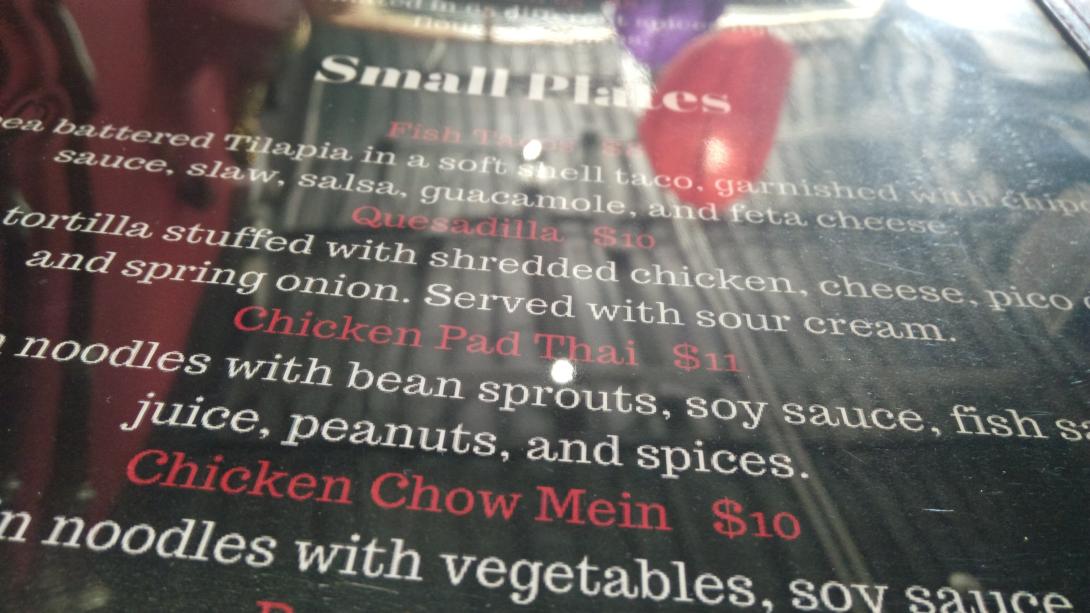
There’s a new restaurant, called Spicey Chef, in the plaza across the street from the Superstore in Charlottetown. True to its name, it sports a broad menu that runs the gamut from butter chicken to fish tacos.

I had the fish tacos with a side of spring rolls for lunch today; the tacos were fantastic, and lived up to the suggestion of fusion in the vibe of the place.

Recommended.

The Spicey Chef , Detail from The Spicey Chef menu , Fish Tacos at The Spicey Chef
🗓️

I was having a conversation with a colleague earlier in the month about Crapaud and its roundness and they brought up the curious situation of South Shore Villa, a community care facility in the village that, because of its position, falls across the Queens County-Prince County boundary.

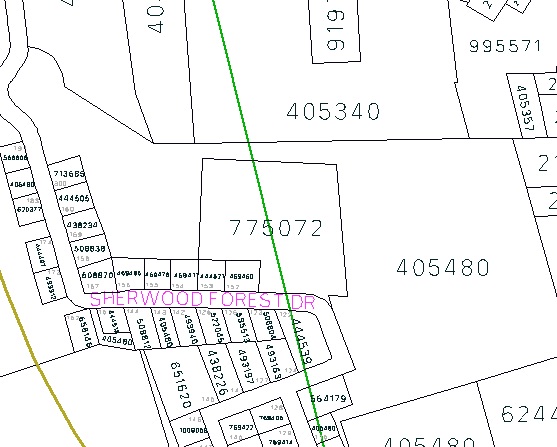
I couldn’t believe that, on top of the whimsy extending from Crapaud’s circularity, there was another geographical flight of fancy in the village, but, sure enough, my colleague was correct. Looking on Geolinc Plus, the province’s property information system, you clearly see the county line (in green) running straight through the middle of property number 775072, which is South Shore Villa:

Geolinc Plus view of PEI PID 775072, South Shore Villa

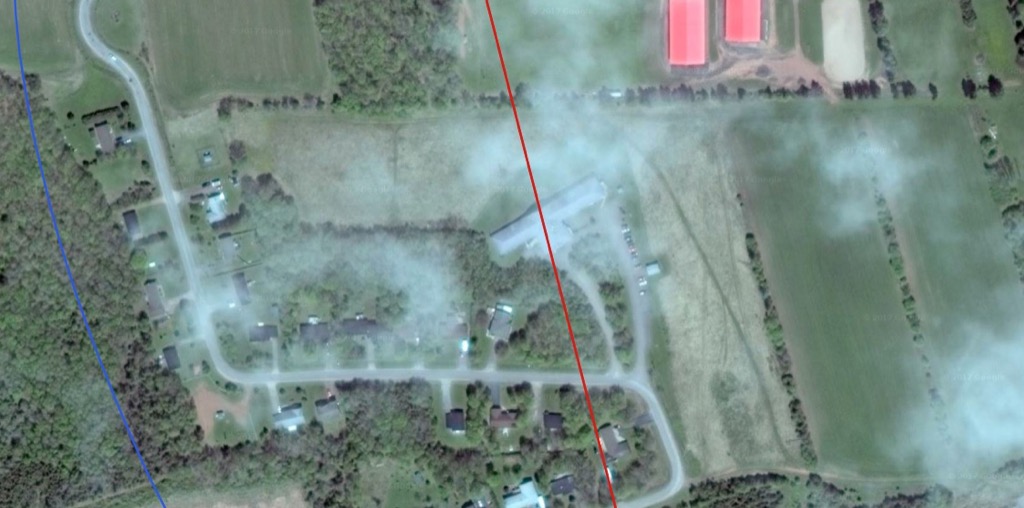
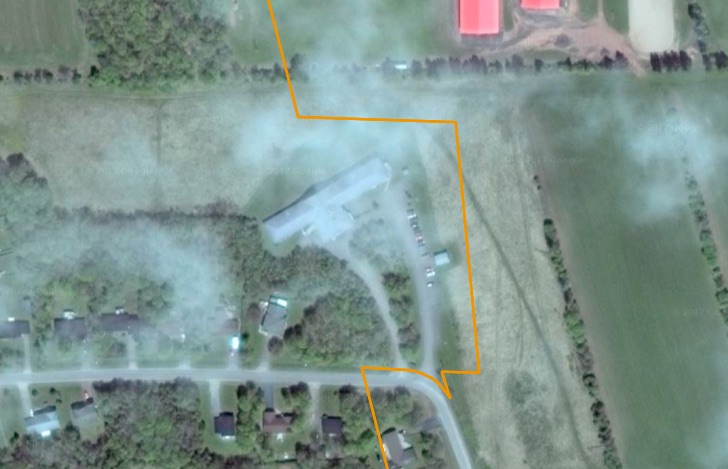
Loading up the county line boundaries and the municipal boundaries in QGIS, and underlaying them with Google’s satellite layer, shows this even more visually: the red county line is running through the middle of South Shore Villa:

South Shore Villa bifurcated by the county line, Google Satellite view

The facility itself makes mention of its bifurcation on its own website (emphasis mine):

South Shore Villa opened in March 1991 under the leadership of the late Robert N. Dawson and the late Ronald P. Dawson. Built on the Prince and Queen’s County line, our locale enjoys a tranquil landscape, pristine in its beauty and spectacular surroundings.

Now you might be thinking “how much more whimsical can this situation get–surely that must be it.”

But you would be wrong, because there’s more!

Despite being inside the (round) municipal boundaries of Crapaud, which might lead you to think it should fall inside the same provincial electoral district as Crapaud, South Shore Villa, in fact, is in District 19 to the west, a jig and a jag that requires it be specifically mentioned in the description of that district’s boundaries (emphasis mine):

…thence southwardly along said strait to the shore of Victoria Harbour at the intersection with the county line between Prince and Queens County; thence northwardly along said county line to the South Shore Villa property; thence following the South Shore Villa property east, north, and west back to the county line; thence northwardly along said county line to the Nineteen Road to the point of commencement…

Here’s what this jig-jag looks like, with the electoral district boundary shown in orange:

South Shore Villa showing inside District 19

This is not a quirk of recent history: this jig and jag existed in the previous incarnation of the electoral boundaries in much the same way, and this was preserved both in the final report of the 2004 Electoral Boundaries Commission and in the Cletus Dunn rearrangement that followed from it.

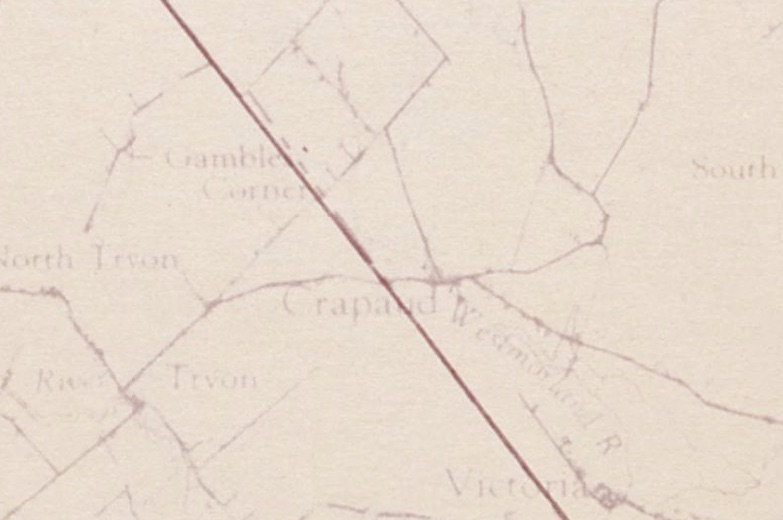
Before 1996’s dramatic rearrangement of electoral boundaries, however, the boundary between 1st Queens and 4th Prince ran along the county line, as you can see on this boundaries map:

Old boundary between 4th Prince and 1st Queens

As such, from 1991 to 1996, the first 5 years of its existence, South Shore Villa was both in two counties, and in two provincial electoral districts. During that time it was represented in the Legislative Assembly by Libbe Hubley and Stavert Huestis, representing 4th Prince, and by Premier Catherine Callbeck and Marion Murphy, representing 1st Queens.

Surely all of this qualifies Crapaud as the most geographically interesting part of Prince Edward Island, doesn’t it?

And I have to imagine I’ve only begun to uncover the village’s secrets.

🗓️
Crapaud  •  Prince County  •  Queens County  •  Geography  •  South Shore Villa

Oliver and I had a spare evening on Thursday, so we decided to drop in on the evening session of the Legislative Assembly of PEI next door.

It was Oliver’s first visit to the public gallery since the Legislative Assembly relocated to the Coles Building, and also his first visit during the term of the MacLauchlan administration (we last visited together in 2007, before Province House started falling down).

It was also Ethan’s first visit to the gallery, a fact that caused a minor, but ultimately efficiently addressed, kerfuffle as we passed through security in the basement (are dogs allowed? does Ethan need a visitor’s badge?). We were treading through fresh snow, so we were happy to be patient.

The Premier rose to the occasion on all fronts, highlighting Oliver’s blog and his social media work, and recognizing Ethan’s presence as the session started:

This is how governance works at small scale.

The topic for the evening session was the consideration of the estimates for the Department of Economic Development and Tourism. As I’ve written here before, the consideration of the estimates has become my favourite part of the work of the Assembly, as it’s an opportunity for we citizens to gain real insights into revenue and expenditure in a way that’s connected to our everyday lives (alas the issues I highlighted in 2016, with the flow of information-on-paper gumming up the proceedings, have yet to be addressed: there was as much page-flipping and “hold on while we make copies” in evidence as there was last year).

During a break in the action, Hon. Tina Mundy, Minister of Family and Human Services, came outside the rail to say hello to Oliver and I, and we chatted a little about service dogs and their powers; a few days later, seeking to rally support for the upcoming Walk for Dog Guides in May, Oliver tracked down her email address and invited her to participate. The next day, having located the nearest walk to her constituency, she wrote Oliver back and committed to attending if she could.

That is also how governance works at small scale.

And I’m proud of the agency that Oliver feels, the connectedness to government, that would be completely absent from his life if we lived in a larger jurisdiction.

🗓️
Legislative Assembly  •  Oliver  •  Ethan

Some nights don’t end the way they start.

Tonight Oliver and I were in the audience at The Walrus Talks at the Confederation Centre of the Arts, an evening of short talks by interesting Canadians, one of 13 such events organized this spring across Canada.

Oliver, for reasons I didn’t completely understand, but nevertheless supported, came equipped with a list of questions.

By way of trying to head off any frustration that might arise both from the night’s programming seeming not have much in common with the questions on Oliver’s list, and from there being no Q&A on the agenda, I gently suggested that this might not be a night where Oliver’s specific intellectual itches got scratched.

Alas this groundwork had the opposite effect: Oliver immediately got rather agitated, and my mind started to go into “how am I going to maneuver my anxious son out of here without upsetting Graham Greene” mode.

Oliver, of course, would have none of this, as if anything is true of him, it is a steely determination to finish anything he starts.

So we stayed. Oliver took deep breaths and, by times, squeezed my hand so tight I thought it might fall off.

And we survived. Even relaxed a little toward the end.

As the crowd let out, we dutifully subscribed to The Walrus as was requested, enjoyed the bountiful buffet lunch, chatted with friends, signed the big map of Canada, and then prepared to head off into the night.

But remember the questions? And the steely determination to finish? Oliver made it clear that we weren’t done yet. There were still questions on the floor.

So I proposed, what with eminent Canadians in the room, that we pluck up our courage and seek answers.

Truth be told, it was only I that needed pluck, as Oliver was primed and ready.

He started with the speaker Clifton van der Linden, CEO of Vox Pop Labs. Oliver asked him about fake news and real news and genuine news. We had a nice chat about Google and Facebook and AI.

Next he sought out speaker (and Colonel Gray alum) Chris Zhou for answers about his views on social media. This led to a chat about engagement and voting and whether politicians who seek advice from advisory councils actually want to listen to it.

Oliver finished the evening by patiently waiting to speak with The Walrus Publisher—and the evening’s convenor—Shelley Ambrose, and asking her “what’s your view of this Island of ours from the viewpoint of The Walrus?”

Shelley, it immediately became obvious, has exceptional people skills, and spoke directly to Oliver—rarer than you might think, alas—and answered his question with passion and conviction.

Questions answered, off into cold spring air we went.

A night that started in distress ended up a night of engagement and answered questions.

And proof—yet again—that if I breathe deeply myself, and listen to my son, he’ll show me what he needs.

And take me places I’d never go on my own to boot.

🗓️

Stumbling across the LIDAR data for Prince Edward Island made me think “I wonder if I can print 3D maps on my 3D printer” (this is called either “lateral thinking” or “getting easily distracted”).

So I decided to try my hand at it.

Here’s what I did.

First, I used the Natural Resources Canada Geospatial Data Extraction tool to grab a digital elevation model of the greater Charlottetown area.

Here are the options I selected:

  1. I zoomed the map into Charlottetown, and selected “Current Map Extent” for the “Clipping Area.”
  2. Under “Select Data” I chose “Elevation Model (CDEM).”
  3. Under “Data Options” I selected “Colour Relief.”

Everything else I left with the default settings. I submitted my request, and about 5 minutes later, I got a download link by email, and that download contained a GeoTIFF file that looks like this:

Charlottetown Elevation Model (exported to a JPEG)

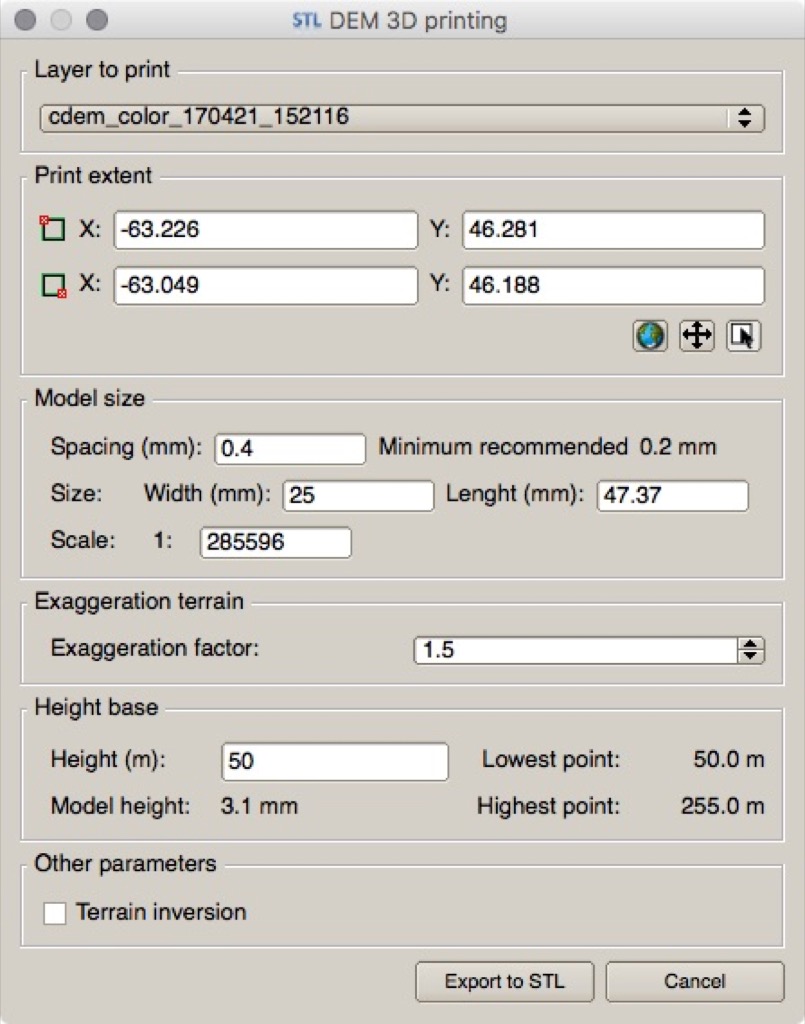
I loaded the GeoTIFF file into QGIS, enabled the DEM 3D plugin (Plugins > Manage and Install Plugins… > DEMto3D), and then, under Raster > DEMto3D, I selected DEM 3D printing and set the printing options as follows:

DEM 3D Options Screen

I set the “exaggeration factor” to 1.5 to have the terrain accentuated: Charlottetown’s not a hilly place, and with the resolution of the printer combined with the small size of the print (about 1 inch by 2 inches), I didn’t want to end up printing a formless void.

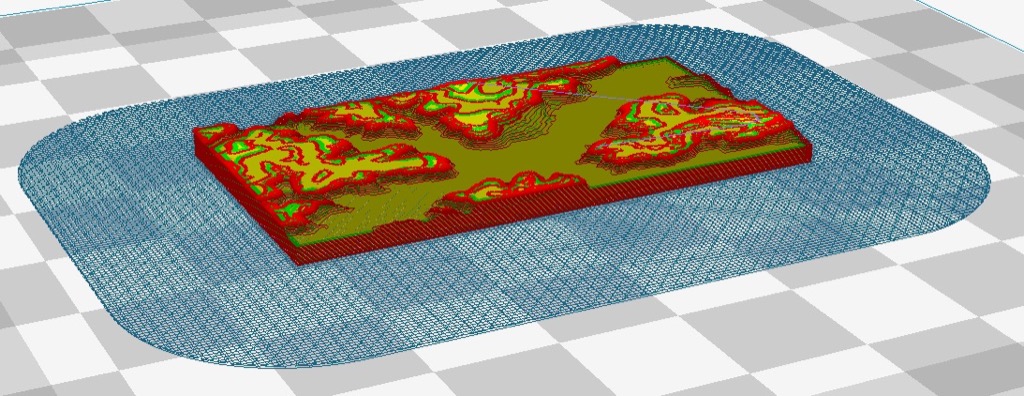
I exported an STL file and then loaded this STL file into Cura for slicing; in the “layers” view in Cura it looked like this (I added a removable “raft” around the the model to mitigate against warping; this may or may not have been useful):

3D Charlottetown sliced in Cura

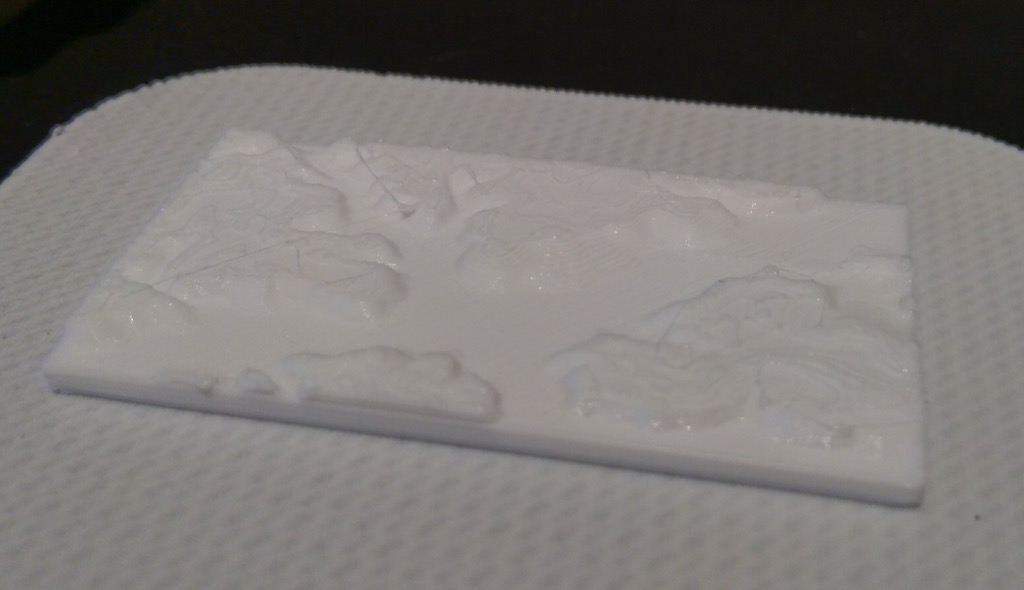
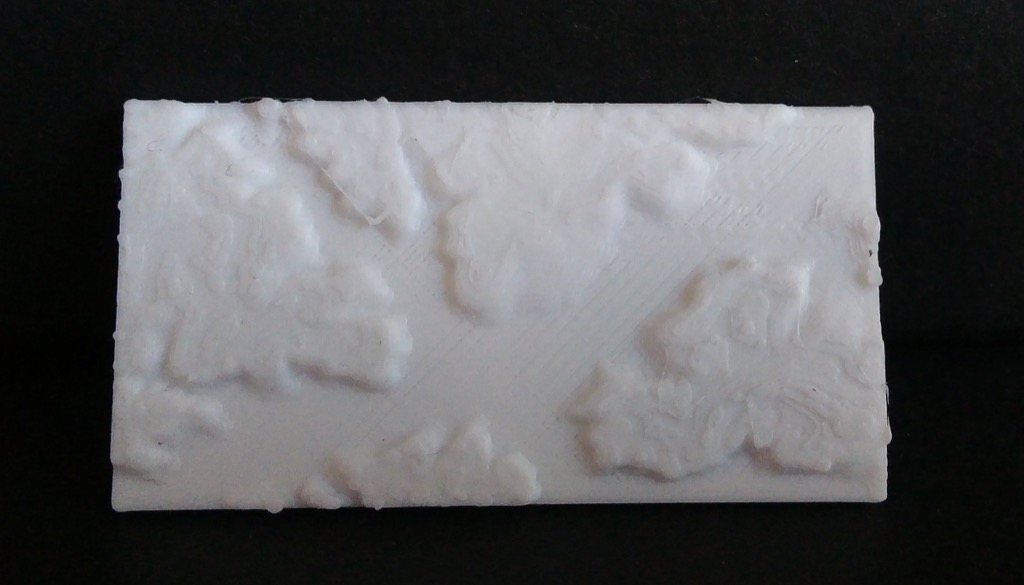
The print took 61 minutes to print; here’s what it looked like when it was done:

3D Charlottetown Print

3D Charlottetown Prince

It’s not a stunning visual tour de force, but it’s a start–really a proof of concept more than anything else–that sets the path for more experimenting.

🗓️
3D Printing  •  Charlottetown  •  DEM  •  STL

About This Blog

Photo of Peter RukavinaI am . I am a writer, letterpress printer, and a curious person.

To learn more about me, read my /now, look at my bio, listen to audio I’ve posted, read presentations and speeches I’ve written, see things I’ve favourited elsewhere, or get in touch (peter@rukavina.net is the quickest way).

I have been writing here since May 1999: you can explore the 25+ years of blog posts in the archive.

You can subscribe to an RSS feed of posts, an RSS feed of comments, an RSS feed of favourites elsewhere, or a podcast RSS feed that just contains audio posts. You can also receive a daily digests of posts by email. I also publish an OPML blogroll.

InstagramYouTubeVimeoORCIDOpenStreetMapInternet ArchivePEI.artDrupalGithub.