
I’ve been thinking more about transparency ticker tapes since I wrote this post.
The problem, I realized, with budget documents, like this 2017 one for Prince Edward Island, is that everything’s expressed in year-long chunks. And when faced with tables like this, most people who are not the Provincial Treasurer, myself included, glaze over with with incomprehension.
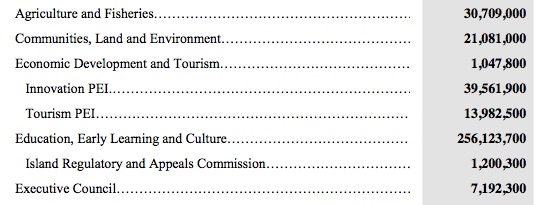
Things become much more comprehensible when you divide year-long numbers by 365 to get day-long numbers.
So, for example, it costs about $726,000 a day to have schools, early learning centres, museums and libraries.
And it costs about $16,000 a day to have a Legislative Assembly, $7,000 a day to have a Chief Public Health Office, $1,900 a day to have a Premier’s Office, and we spend $21 a day on forest fire equipment.
We get about $2 million a day from the federal government, $90,000 a day from tobacco taxes, $20,000 a day from beverage container deposits, and $1,900 a day from boiler, electrical and elevator inspection fees.
When everything is rolled together, we take in about $4.9 million and spend about $4.4 million, every day of the year (note that I’m not including the substantial $197 million a year spent on interest and amortization in this calculation).
The Hollywood community space Junior High is transparent about its finances. For example:
rent / landestine, llc: $2500.00
electricity / los angeles department of water and power: ranging from $60-$150
internet / time warner cable: $79.99
toiletries and cleaning supplies: ~$25
restock on merchandise: ~$500
retail supplies: ~$50
paypal and paypal here for retail sales and additional banking. paypal is a business we do not support ethically, but are having trouble finding another company with similar ease and accessibility that does not subscribe to shitty ethical practices.
I’ve been thinking a lot about government and transparency; I’d like to see a similar human-readable ticker tape from the provincial government, for example, summarizing expenses and revenue every day.
We spent $32,000 on road salt and $79,000 on CT scans today, and took in $46,000 in HST revenue.

Island legislators have been in a tizzy this week about documents tabled by Hon. Tina Mundy, Minister of Family and Human Services, that accidentally had political annotations on them.
In doing so, Ms. Mundy lifted a curtain on a practice that everyone knows goes on–political primping during polling season–and that has been practiced by all political parties for generations.
One wishes, as the opposition has highlighted, that governments were less concerned with “good news,” and more concerned with “good governance.”
But the issue is hardly deserving of the fusillade that has been lobbied. And, ironically, the fuss that’s being made has taken the opposition’s attention away from holding government to account on things that is should actually be held to account for.
In light of all this, let me relate another Tina Mundy story.
Last month Oliver and I went to an evening session of the Legislative Assembly. As the evening went on, there was a break in the proceedings while members waited for some photocopying to happen, and during this break Ms. Mundy came outside the rail to speak to us. She sat down in front of us on one of the pews in the public gallery, and we had a pleasant conversation about, among other things, Oliver’s service dog [[Ethan]]. She was curious and engaged, and talked to Oliver as a human being; these are qualities you want in your Minister of Family and Human Services, and this made me happy.
Later that night, after we got home, Oliver and I were chatting about the Walk for Dog Guides that’s coming up at the end of May, and how we could encourage people we know to support it. Unbeknownst to me, Oliver then took the opportunity to send a message to Ms. Mundy encouraging her to participate in the walk; the next day he received a message from her back telling him that she’d looked up the walk in her district in Summerside, and that she’d make an effort to attend if she could.
Politicians do boneheaded things. People do boneheaded things. While we shouldn’t ignore them, and while we should treat them seriously if they have serious import, we should also remember that we all do thousands of non-boneheaded things every day. And some days those things, while they might seem small and inconsequential in the grander scheme of things, can show a young man that engaging with politicians is a normal, everyday thing.
Every now and again, Google Photos goes off half-cocked and comes up with its own collages of my photos. Here’s the one it offered up to summarize two years ago this week; the robots appear to assume that “dark Pete” and “light Pete” are two different people.

Remember when I signed up for the Brave Publisher program back in March?
Well yesterday I got an email message telling me I’d received 0.00530655 BTC (Bitcoin) from someone, and I confirmed with Brave that it was they who sent it to me.
That translates to about $13 CAD.
Which is pretty weird, given that I have a tiny low-trafficked blog on the edge of the continent.
That money all comes from readers like you, who’ve deposited Bitcoin in your Brave browser kitty.
Thank you.
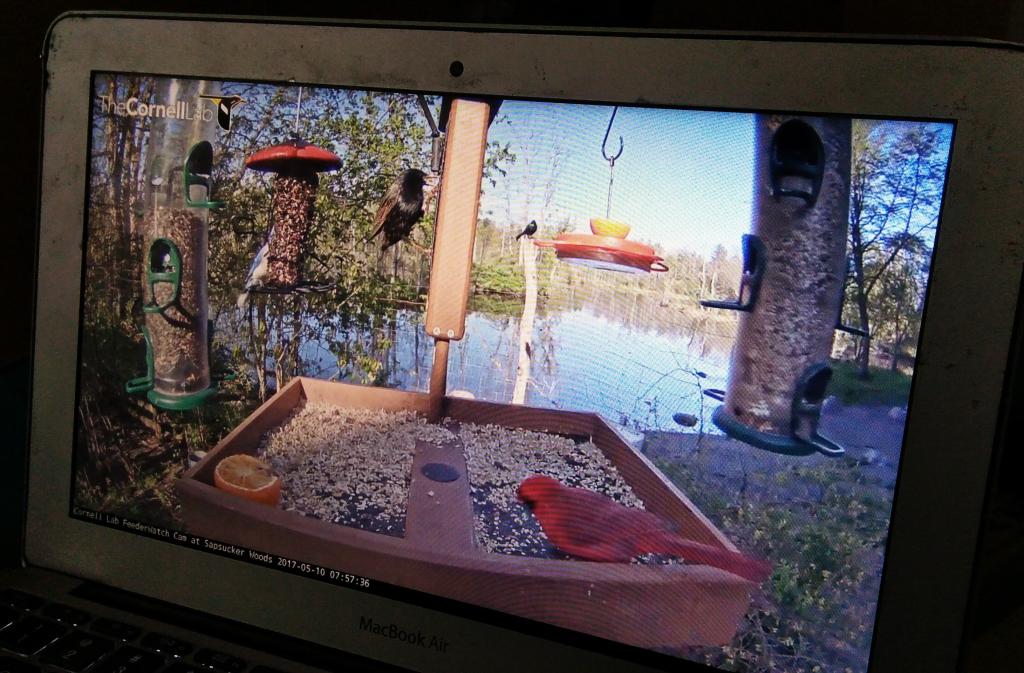
I’m late to the bird-cam party, but this is compelling. And I’m no birdwatcher (in fact I’m actively anti-birdwatching). Streaming live on YouTube.
Our house at 100 Prince Street is 190 years old this year, and so it long-ago entered the “needs constant upkeep or entropy will take over” phase of its life.
One area where this crops up regularly is in the tightness of the door hinges. While these are in no way original equipment, they are feeling their age nonetheless, and about once a year I need to tighten things up. Two years ago I could only do this by removing the screws from the doorjamb and sticking some matchsticks in the screw holes to add some friction; last year this stopped working, and the only advice I could extract from Home Hardware was “use longer screws.”
Longer screws kept us going for another year, but this year that wasn’t enough and I needed more drastic action.
The Internet assisted me greatly in this regard, and the approach I took–which worked like a dream–was this:
- Unscrewed the hinge from the doorjamb.
- Removed all the matchsticks, toothpicks and other stopgap measures from the screw holes.
- Drilled out each of the screw holes with an 11/32” drill bit.
- Inserted a 3/8” diameter, 1-1/2” long dowel, covered in Elmer’s wood glue, into each hole, and tapped each with a hammer until they were flush.
- Waited an hour for the glue to dry.
- With the hinge in place over the doorjamb, I marked and drilled pilot holes with a small drill bit.
- Replaced the original screws.
With the dowels in place, the screws held well, and the hinges are now pleasantly tight. As a result the door swings freely, shuts easily, and doesn’t make that horrible screeching sound it made all spring.
A pack of 20 dowels was $2.49 at Kent Building Supplies.
A reader writes:
Do you have a stat / graph showing how much of the year we do not use fossil fuel? Are we gaining year over year?
I have been archiving data on Prince Edward Island’s electricity generation and load since November 2013, every 15 minutes (with some gaps in the data when the provincial monitoring feed had technical issues). I’ve archived 160,713 samples to date. Of those samples, in 9,307 (6%) of them did PEI wind energy generation exceed PEI wind energy load, turning the Island into a net energy exporter.
On a year by year basis it looks like this:
| Year | Total Samples | Wind > Load | Percentage |
|---|---|---|---|
| 2012 | 4606 | 214 | 4.65% |
| 2013 | 33655 | 1535 | 4.56% |
| 2014 | 34782 | 1496 | 4.30% |
| 2015 | 34867 | 3040 | 8.72% |
| 2016 | 34604 | 2010 | 5.81% |
| 2017 | 18200 | 1012 | 5.56% |
Note that the “percentage” figure in the table does not represent the “percentage of PEI’s electricity load that was generated from the wind”; what it does represent, simply, is the number of times in a year when, during a 15 minute interval, wind energy generation exceeded load, turning the Island into an energy exporter (and, in theory, making us “zero carbon” for electricity).
The reason this came up in the first place is that this has been a spectacular weekend for wind energy generation on the Island: since 2:00 a.m. Saturday morning wind energy generation (the red line on the chart below) has, with a few short exceptions yesterday afternoon, exceeded electricity load (the green line on the chart), sometimes by as much as 160%.
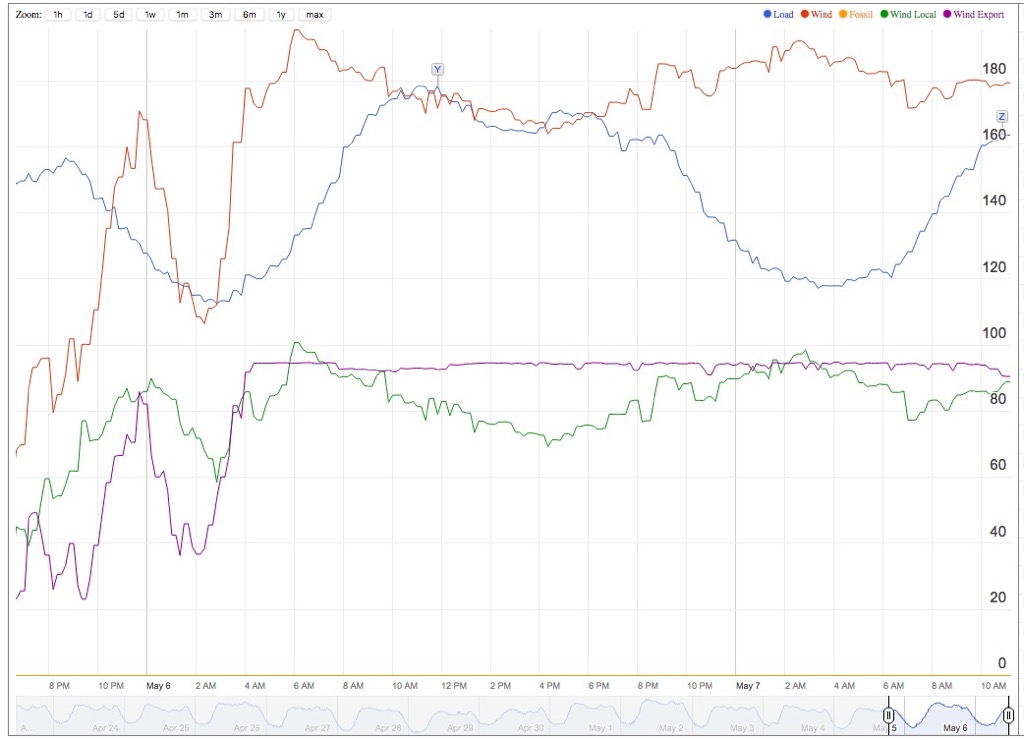
A reminder that you can follow along using the handy mobile-friendly page at pei.consuming.ca or, for more context, this 14 day chart.
About This Blog
 I am Peter Rukavina and this is my blog. I am a writer, letterpress printer, and a curious person.
To learn more about me, read my /now, look at my bio, listen to audio I’ve posted, read presentations and speeches I’ve written, or get in touch (peter@rukavina.net is the quickest way).
You can subscribe to an RSS feed of posts, an RSS feed of comments, or a podcast RSS feed that just contains audio posts. You can also receive a daily digests of posts by email.