
In the February 8, 1899 edition of The Guardian, a story of election intrigue from Prince County concerning the rise and fall of Amédée “Meddie” Gallant, farmer and fish exporter and Liberal candidate for the district of First Prince:
Unseated and Disqualified
Judgement Given Against Meddie Gallant at Alberton Yesterday
The adjourned sitting of the Election Court was held at Alberton yesterday when Judge Hodgson gave his decision in the matter of the election petition filed by Peter T. Bernard against the election end return of Meddie Gallant as a member for the first Electoral District of Prince County in the Legislative Assembly.
Owing to the resignation of Edward Hackett, who in the general election of 1897, was elected member, a vacancy occurred and an election took place on the 20th July last, when Meddie Gallant stood as the Liberal candidate, and Mr. Buote, editor of Le Impartial, was the Conservative candidate. Gallant was elected and a petition was subsequently filed by Peter T. Bernard charging corrupt practices both by Gallant personally and by his agents.
The trial of this petition took place in December last at Alberton before Mr. Justice Hodgson, and after hearing the evidence judgment was reserved until yesterday.
A special despatch from Alberton to the Examiner says:
The court room was densely crowded.
The court held the respondent, Meddie Gallant, to be guilty of treating by Martin Hussler and Trail Reid, his agents. Also of treating by Benjamin Gallant, an agent, but without the knowledge of Meddie Gallant.
The charge of bribery of Wedge by Meddie Gallant was examined at great length by the Judge, and although the circumstances were very suspicious he held that there existed reasonable doubt, the benefit of which every one charged with an offence is entitled to. He therefore held the charge “not proven.”
The charge of bribery of Colo. Arsenault by Gallant was held by the Judge to be fully established and the Election was set aside.
The result of this finding is that Meddie Gallant is debarred from voting or being voted for or from holding any office under the Crown, or under the Lieutenant Governor for eight years.
Before the close of his judgment the Judge paid a high compliment to the manner in which the evidence had been reported by Mr. Crosskill, the stenographic reporter.
A month later, on March 22, 1899, a follow-up story in The Guardian, with some added newspaper-on-newspaper chiding thrown in, suggested that Gallant had appealed, successfully, and was to be allowed to re-offer:
Mr. Meddie Gallant did not appear in vain to the full court. The judgment of the Master of the Rolls had unseated and disqualified him. The judgment of the full court reaffirms the decision that his seat is made vacant but reverses the disqualification. Mr. Gallant will therefore be eligible for re-election should he choose to become a candidate and should his friends re-nominate him. Mr. Justice Hodgson still adheres to the position which he took at the election trial, but we think the general sentiment of the community will agree with the majority of the court that the case was not one for the extreme penalty of the law. The judgment now rendered makes it quite clear that an evening newspaper was wrong in assuming that a full Bench would necessarily confirm Mr. Gallant’s disqualification.
On July 19, 1899 a by-election was begun:
Court was opened at 10 o’clock yesterday by Sheriff Gaffney for the purpose of nominating candidates to contest the election in 1st district of Prince County. Mr. Meddie Gallant and Mr. H. J. Pineo were nominated in the interest of Liberals and Conservatives respectively. Court adjourned at 4 p.m. until Saturday July 29th which will be Declaration Day.
On July 25, 1899 the election was held, reported The Guardian:
A by-election for the Provincial Legislature takes place today in the First District of Prince. The candidates are Mr. Gallant, Liberal, and Mr. Pineo, Conservative. There has been very little “campaigning” done by the party newspapers on either side. Perhaps this is quite as well, but it is in strong contrast with what takes place in other Provinces on similar occasions. We hope to be able to announce the result in tomorrow’s issue.
As promised, on July 26, 1899, the results of the by-election:
The Prince Election
The Opposition Candidate Elected By a Small Majority
An Unexpected Result–Conservative Gains in French-speaking Districts
There was little general interest taken throughout the Province in the by-election held yesterday in the First district of Prince. In Charlottetown the active politicians of both parties were on the alert to hear the news, but until it came the opinion of the large majority was that Mr. Gallant would receive the majority of the votes. The result proved otherwise and has exceeded some surprise.
Mr. Gallant had the advantage of some experience and the sympathy that usually comes to a candidate who having been once returned by a good majority is afterwards unseated by the courts. The changes appear to have been principally in the French-speaking sections of the District. Various reasons are assigned for these including the unpopularity of the lobster and oyster fishing regulations. And it is hinted that some electors, with a desire to influence a pending judicial appointment, may have voted for the Opposition candidate with a view to make the government reluctant to open another constituency at the present time.
The following are the returns from the several polling places at yesterday’s election, side by side with those of the election last year between Mr. Gallant and Mr. Buote:
| 1899 | 1898 | |||
|---|---|---|---|---|
| Gallant | Pineo | Gallant | Buote | |
| Nail Pond | 63 | 112 | 68 | 90 |
| Palmer Road | 174 | 204 | 212 | 184 |
| Tignish | 65 | 133 | 82 | 110 |
| Greenmount | 76 | 134 | 86 | 140 |
| Dock Road | 114 | 86 | 103 | 76 |
| Bloomfield | 173 | 90 | 209 | 82 |
| Alberton | 119 | 58 | 132 | 82 |
| Miminegash | 42 | 67 | 66 | 37 |
| Fortune Cove | 78 | 51 | 105 | 46 |
| TOTAL | 904 | 935 | 1063 | 847 |
So, after all that, Meddie Gallant lost the by-election by 31 votes, and Henry J. Pineo (or Pineau) was elected.
For The Guardian, and its rival newspaper The Patriot, however, the contest was still on, and it turned semantic:
The newspaper-on-newspaper action continued in The Guardian on July 31, 1899:
The Patriot has not yet announced the result of its Guessing Bee on the Tignish election. Why not revise the offer and give prizes to those who guessed the fartherest away from the numbers polled! In that way the Pioneer would probably get the college course and the subscription to the Patriot might be given as a consolation prize to one Mr. Gallant.
The following day The Guardian suggested that the Patriot was fighting back:
The skittish Patriot skies a little at the word “fartherest” in yesterday’s Guardian. The word affords an interesting study. It is a sort of tandem team made up of the comparative and superlative degrees. We would have been quite content with the superlative alone in the shafts; but the intelligent compositor knew better and hitched on the extra horse. If the Patriot had not shied our tandem would have run him down. The “fartherest” distance that we know of is between the true sense in which the Guardian seeks to promote temperance and the Lie-sense by which the Patriot claims to support the same cause.
Newly-elected Henry J. Pineau, meanwhile, was in office only until the following year.
But what a year it was.
Here’s how his biography relates the story:
Pineau, a Conservative and later a Liberal, was elected to the Legislative Assembly in a by-election held 25 July 1899 for 1st Prince. During the years 1899 and 1900, Pineau was a central figure in the House, as the Liberal government attempted to maintain a slim majority. A sitting Conservative, Pineau, who had been conspicuously absent for a number of months, at a crucial moment switched to the government side.
The crisis for the Liberals began during the 1899 legislative sessions, when Joseph Wise broke ranks with the government and voted with the Conservatives. Premier Donald Farquharson made efforts to persuade him to resign his seat. Wise agreed to do this if a by-election was held before the spring 1900 session. The by-election did not go ahead and Wise withdrew his resignation. During the 1900 session, on 8 May, his resignation was announced in the House, but this was immediately followed by Wise defiantly taking his seat. Amidst pandemonium, his vote with the Conservatives, which would have defeated the government, was not recognized by Speaker James Cummiskey. The next day, Wise attempted to take his seat while the Speaker entered the refuted resignation into the record. Wise refused to withdraw when asked, and then was removed from the Legislative Assembly by the Sergeant-at-Arms, assisted by the House Messenger. He was locked in the Speaker’s room until the House adjourned. When order was restored, Farquharson held on to power, as Pineau had switched his political allegiance to the Liberals.
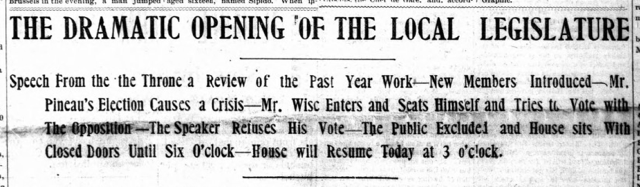
The Guardian headline of May 9, 1900 tells almost this entire story in the headlines alone:
Ironically, Pineau, who was to play such an important role in the unfolding drama, was not in the house on May 8.
Pineau was, however, present the following day, May 9, and The Guardian picked up the story in the May 10 edition:
After the doors were opened Mr. Pineau was introduced by Hon. Peter McNutt and Hon. Jas. Richards, and after he had taken the oath and signed the roll he took his seat on the Government side of the house, amid the cheers of the members of the Government and the hisses of the gallery.
The day’s business in the house concluded on matters relating to hats, reported The Guardian:
Mr. J.A. McDonald–Is that the Governor’s speech? If so remove your hat!
Members of the Opposition–Can you show any rule or precedent for not removing your hat?
After the reading of the speech the House adjourned until 10 this morning.
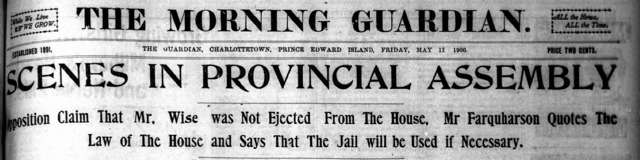
The scene the following day was no less interesting, with almost the entire front page of The Guardian devoted to reporting the proceedings of the House, under this headline:
One would think that supporting the government by crossing the floor would be enough excitement for a freshman MLA, but on June 9, 1900 Pineau again rose to the fore, this time with allegations of bribery; The Guardian reported:
In reply to some statements made by Mr. Campbell, Mr. Pineau said he represented a just people, a law abiding people. It was no wonder that Mr. Campbell and Mr. McLean were mad. They were deprived of something which they expected. He had lots of offers from the Conservative party. He had an offer only today of $250 to vote against the Prohibition Bill, but he would not accept the bribe.
The Journal of the Assembly reported what followed, a resolution to form an enquiry:
That the House do now resolve itself into a Committee Of the whole, with power to send for persons, papers and records and to examine witnesses on oath, to enquire into the allegations of Henry J. Pineau, member for Tignish in this Legislature, to the effect that the said Henry J. Pineau was approached on June 8, 1900, by a Conservative who offered him the sum of $250.00, if the said Henry J. Pineau would vote against the Prohibition Bill now before this Legislature.
That motion was defeated, the “Prohibition Bill” passed shortly thereafter, the House was prorogued that same day, not sitting again until March of the following year, following a December 1900 election in which Pineau didn’t run.
Pineau died in Miminegash in 1904, at the age of 41.
As for Meddie Gallant: he never served as an MLA again, but, according to his biography, he continued to be an important force in the community:
“Meddie” Gallant, a resident of Bloomfield, was a farmer and operated a fish export business in Miminegash for several years. He was the supervisor of highways for West Prince and had the telephone installed in his area for better communications in his work.
in the Provincial General Election of December 12, 1900, Liberal Benjamin Gallant became Assemblyman for First Prince, holding the seat until his death 21 years later, winning five elections in the process.
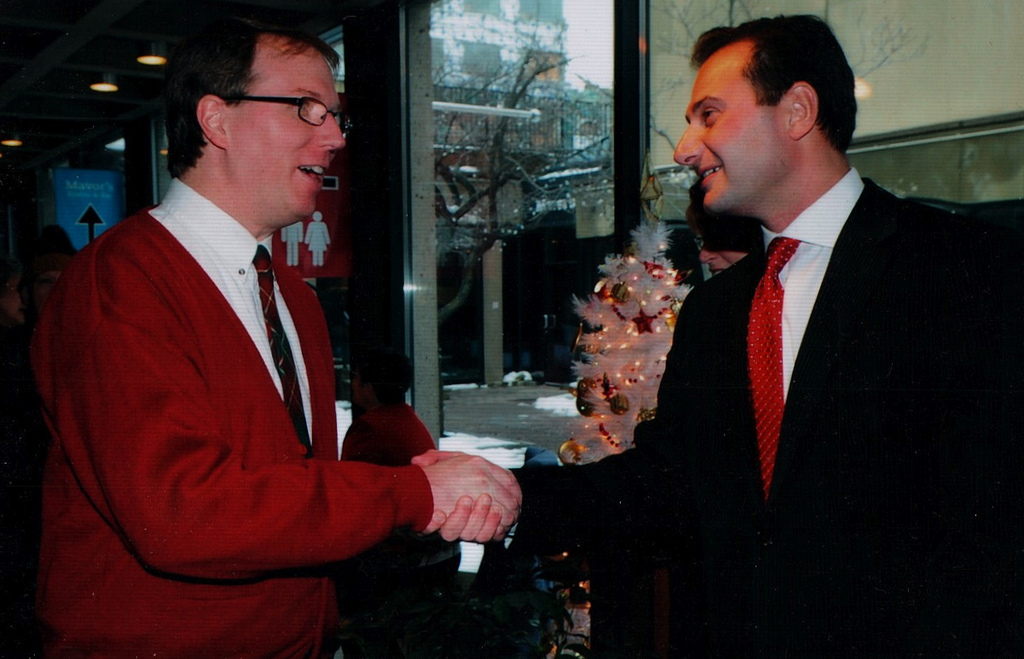
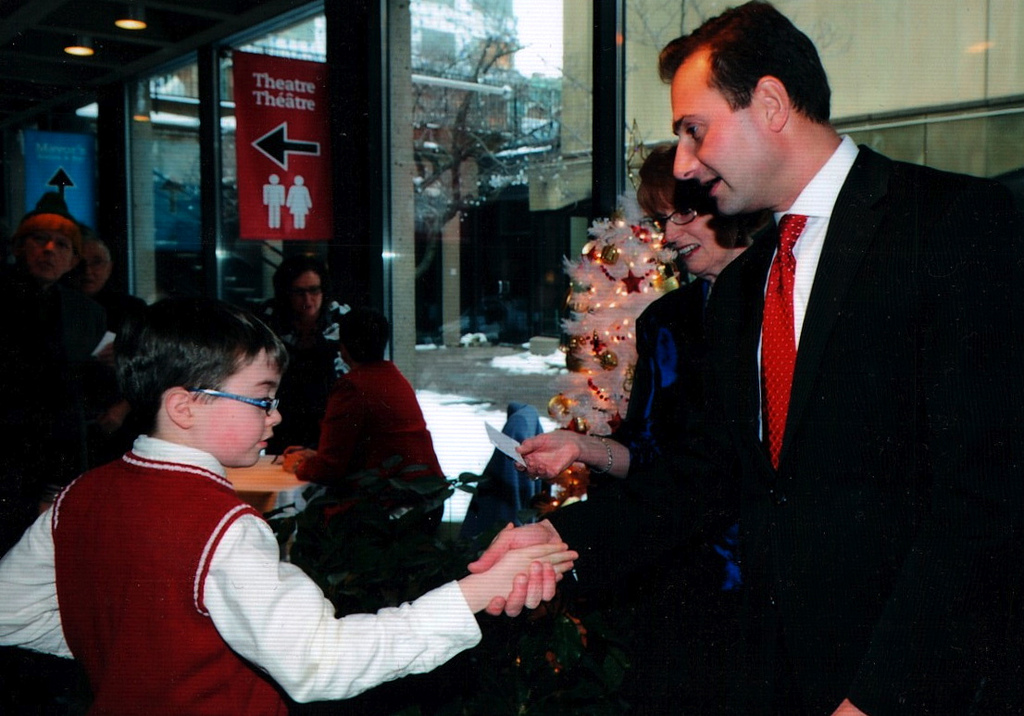
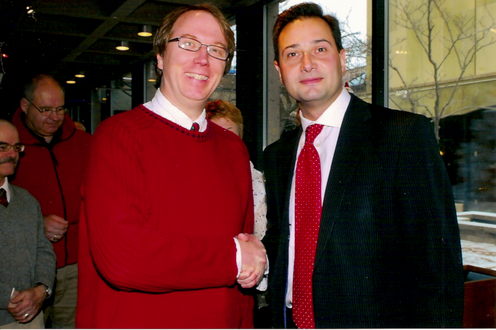
The annual photo-with-the-Premier-at-the-levee arrived in the mail a few months ago (how those experts in the Premier’s Office manage to connect all the photos with all the people in the photos continues to amaze me year after year). This year’s levee, Premier Robert Ghiz’s last, was held in Province House, and it was our first levee with Ethan the Dog along, so the Premier was obviously distracted, as was I. Oliver, however, was making eye contact and shaking hands.
(Updated for 2016 since I originally wrote this; see this post about the 2016 photo).
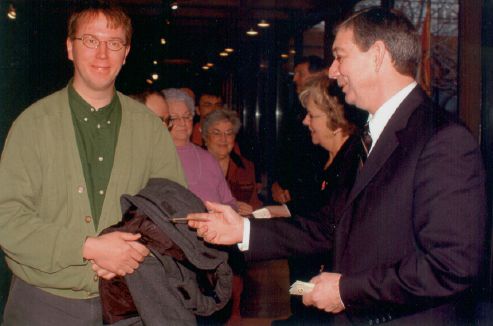
2016

2015

2011
2010
2006

2005
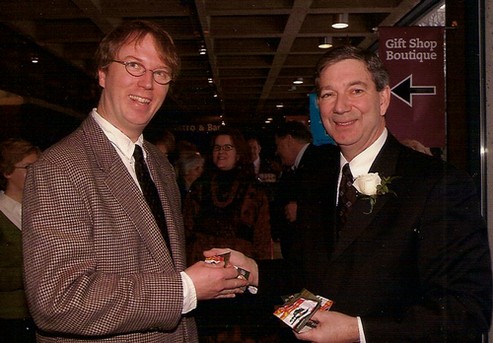
2004
One of the challenges in setting up the Raspberry Pi’s I use for the Social Consumption Project is that I need to arrive at my test households with a ungainly HDMI monitor plus a keyboard to allow me to configure the units for the wifi network in the house. This only takes a few minutes, but I need a keyboard and a display to be able to do it.
To help address the ungainliness of this, I purchased a LCD Car Reverse Rearview Monitor Color Camera DVD VCR Remote Control 4.3’ TFT hg for about $16 in eBay from a Chinese vendor. These units are intended to be connected to “backup cameras” in automobiles, but they’re just regular everyday analog video monitors with an RCA input, so, in theory, they can also be used as a display for a Raspberry Pi.
The unit arrived a few weeks ago, and my first challenge was finding a power supply for it: because it’s intended for in-car use, it needs a 12 volt power supply (the web is full of mods to allow it to be USB-powered, but I didn’t want to take out a soldering iron). Fortunately I had an old Apple power supply here in the office (not the first time the “never throw away old power supplies” rule has paid off), so that solved that problem.
However even with the power supply in place, I couldn’t get the display to, well, display.
Fortunately, the solution was simple: following the advice here, I commented out this line:
hdmi_force_hotplug=1
in the /boot/config.txt file and rebooted.
Presto! I had video:

I then followed the helpful instructions here, and changed the console font size to a bigger one (16x32 Terminus), which makes for a much more readable console:

It even displays video:

It’s been remarkable to hear the degree to which the wholesale eradication of the elm trees of Charlottetown has affected people of the city.
People from all walks of life, of all political stripes, of all relationships to the ecology of the city.
Never have trees received so much of our collective attention, alas, until they’ve fallen.
Recognizing this, a group has assembled to organize Ode to the Elms of Charlottetown: An Earth Day Remembrance, a sort of “tree memorial” being held Wednesday, April 22 at 7:00 p.m. at Trinity United Church on Prince Street in Charlottetown.
There will be songs and stories and art and remembrance. It’s not a “religious” event, but certainly it’s a spiritual one, inasmuch as the spirits of the fallen trees are very much on everyone’s minds.
There’s a Facebook event where you can ask questions and get more information.

Among the many things contained with the Mike Duffy Diaries are notes of the movies he attended from January 2009 to December 2012.
Our taste in movies has considerable overlap; of the 34 movies he notes, I’ve seen 24. Here’s a handy list should you wish to see them all:
- January 19, 2009: Defiance
- February 8, 2009: Taken
- May 15, 2009: Angels & Saints
- December 23, 2009: It’s a Wonderful Life
- January 1, 2010: At Sea and Doubt
- January 31, 2010: Edge of Darkness
- March 20, 2010: Hurt Locker
- September 8, 2010: The American
- October 29, 2010: Convicted
- November 20, 2010: Wall Street
- December 30, 2010: The King’s Speech
- January 5, 2011: Barney’s Version
- January 26, 2011: Unknown
- April 23, 2011: The Lincoln Lawyer
- July 9, 2011: The Remains of the Day
- August 3, 2011: Horrible Bosses
- September 11, 2011: The Debt
- October 15, 2011: Ides of March
- October 23, 2011: Johnny English
- November 20, 2011: J. Edgar
- November 38, 2011: The Descendants
- December 11, 2011: Margin Call
- December 25, 2011: War Horse
- January 5, 2012: The Iron Lady
- January 6, 2012: Tinker, Tailor, Soldier, Spy
- February 25, 2012: The Safe House
- May 28, 2012: Away from Her
- June 2, 2012: The Best Exotic Marigold Hotel
- October 5, 2012: The Master
- October 13, 2012: Argo
- November 12, 2012: Skyfall
- November 15, 2012: Flight
- December 9, 2012: Lincoln
(Updated April 22, 2015: Green Party additional candidates)
According to the 2011 census, Prince Edward Island is made up of 48% men and 52% women. One would expect, then, that political parties would seek to run approximately equal numbers of men and women across the 27 provincial electoral districts. All parties have now published the lists of candidates nominated for the 2015 provincial general election:
| Party | Nominated | Women | % Women |
|---|---|---|---|
| Green | 22 | 9 | 41% |
| Liberal | 27 | 7 | 26% |
| NDP | 27 | 9 | 33% |
| PC | 27 | 6 | 22% |
According to the PEI Coalition for Women in Government, 22.2% of MLAs are women, slightly under the national average of 24.7%.
The Coalition’s 2005 Action Plan to Elect Women in PEI set an initial goal of electing a critical mass of 33.3% women in the following provincial election, pushing on to elect 50% women by 2015. In this first phase, the Coalition says, they were “successful in garnering public commitments from all four provincial parties active at the time that they work towards the goal of nominating at least 9 women (33% of candidates) in provincial elections.”
What happened?
I’m not a stranger to gender issues in democratic organizations: the organization I lead, the PEI Home and School Federation, is a broadly-based one, rooted in 53 member associations in local schools. The presidents of an overwhelming majority of those locals are women, and our provincial board is 73% woman and 27% men. This all despite our work to include more men in home and school.
Balanced gender representation in our public institutions is something we all need to work harder at.
|
Green #168E45 |
Island #9F100C |
Liberal #E31B25 |
NDP #F78F1E |
PC #013E7F |
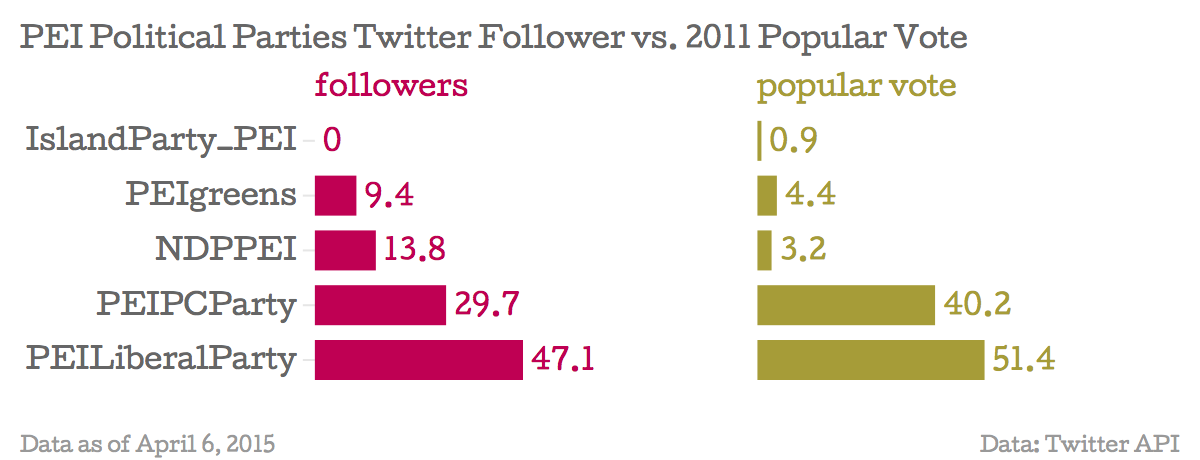
Twitter displays a “followers” count for every user and using the Twitter API this information can be extracted for a collection of Twitters users. I fed the Twitter handles of PEI’s registered political parties into the API and extracted follower counts for each party:
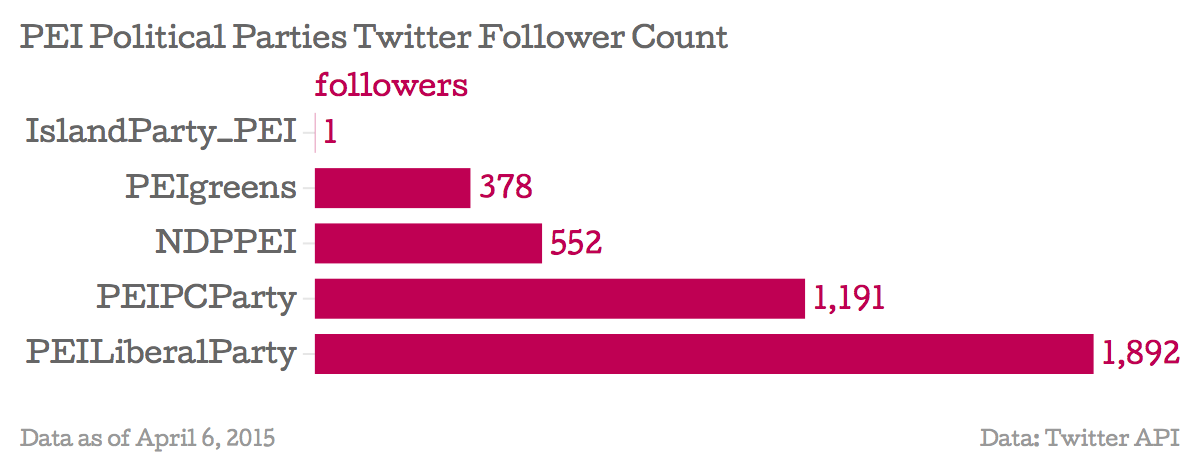
I thought it would be interesting to contrast the Twitter follower “popular vote” with the actual popular vote from the 2011 Provincial General Election. This isn’t quite an apples-to-apples comparison because whereas each elector can only vote for one party, each Twitter user can follow any number of others. To calculate the “followers” number, I took the total number of followers of all parties, and then took each individual party’s total followers as a proportion of that. Of course, “Twitter users” is an imperfect reflection of “electors.” Also, following a party doesn’t necessary convey supporting that party (journalists, for example, will often follow all the parties). But it’s an interesting comparison nonetheless, inasmuch as the two sets of numbers are somewhat aligned:
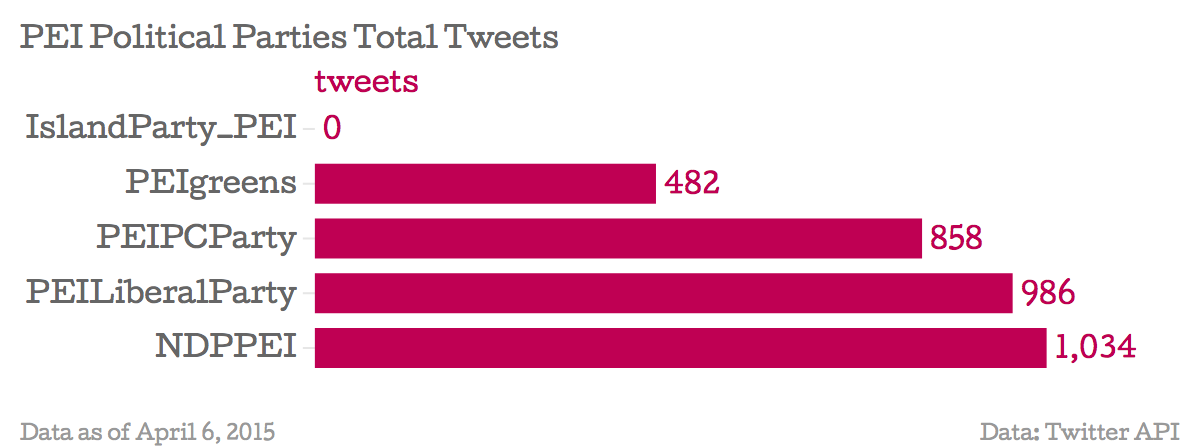
It’s a different story when you compare the number of tweets each party has posted over the years they’ve been active; the NDP is the clear winner here. Again, though, this isn’t necessarily a measure of anything other than proclivity for tweeting.
Speaking of “over the years,” here’s when each party launched itself onto Twitter:
| Party | Account Creation Date |
|---|---|
| PEIgreens | February 3, 2015 |
| IslandParty_PEI | October 9, 2012 |
| PEILiberalParty | July 18, 2011 |
| NDPPEI | November 15, 2012 |
| PEIPCParty | July 28, 2011 |
If you want to keep up with all the parties without having to follow any particular one (or any at all), you can watch this Twitter list of all the parties.
I’m archiving all of the data I used here every night at midnight, and I’ll update this post as the putative 2015 Provincial General Election progresses. That charts, by the way, come via the excellent, free Chartbuilder web tool.
Now we know who is making website for PEI political parties, what about the underlying software, the so-called “content management system” that parties use to maintain their websites.
For every site on the web, you can “view source” in your web browser to see the “source code” of the website – the HTML, CSS and JavaScript that together define how the website looks and what its contents are. By examining the source of Island political party websites, it’s easy to tell what content management systems they’re using:
| Party Website | Content Management System |
|---|---|
| Green Party | Drupal 7.35 |
| Island Party | Not obvious |
| Liberal Party | CMS Made Simple |
| NDP | WordPress 4.1.1 |
| PC Party | WordPress 4.1.1 |
The clues I used to help me identify which CMS each party is using are as follows:
Drupal
In the HTML source of the site it’s explicity stated:
<meta name="Generator" content="Drupal 7 (http://drupal.org)" />
In addition, the login page for the CMS is at the standard Drupal location of /user.
It’s worth noting that the Green Party is keeping its Drupal 7 installation up to date: if you visit the CHANGELOG.txt for the site, you’ll see that it’s running version 7.35, which reflect a mid-March security patch.
CMS Made Simple
The site is currently offline, but by searching Google for cache:http://movingforwardpei.ca/ I was able to retrieve an older cached version. There’s no explicit evidence for what the CMS is, but references to “modules” called “MenuManager” and “Showtime,” both of which are party of that CMS, are a good sign.
WordPress
A set of clues, including this explicit statement (which only appears on the NDP WordPress):
<meta name=generator content="WordPress 4.1.1"/>
and frequent references in the HTML source to “wp-content”, a commonly-used WordPress directory.
In addition, the login pages for both the PC and NDP sites are in the standard place at /wp-login.php.
As with the Green Party and Drupal, both the PC and NDP WordPress sites are running the latest version, 4.1.1, released in mid-February.
Every time you type a web address into your browser, you’re using something called a domain name – the one for this website, for example, is ruk.ca.
Anyone can register a domain name and there’s a directory of who’s registered what that’s called WHOIS: with this tool you can connect a domain name to the person or organization who registered it.
There’s used to be one big WHOIS for the entire Internet, but, with the expansion of the Internet, the directory has now splintered and you need to go different places for different domains. For the .ca domain, used here in Canada, Webnames.ca’s WHOIS is one place to go.
Every domain name has a “Registrar” (the company paid to register the domain name), a “Registrant” (the person or organization who registered the name) and an “administrative contact” (the contact person for the domain).
Using that tool, you can find out something about the websites of the Island’s registered political parties; It’s possible to hide the registrant and the administrative contact when you’re registering the domain; The Island Party is the only party that opted to do this. Here’s where the domains for the Island’s parties are registered, and by whom:
| Party Website | Registrar | Registrant | Administrative Contact |
|---|---|---|---|
| Green Party | DomainsAtCost Corp. | Green Party of Prince Edward Island | Stiles |
| Island Party | Go Daddy Domains Canada | Hidden | Hidden |
| Liberal Party | Webnames.ca Inc. | Results Marketing and Advertising | Heather Howatt |
| NDP | DomainsAtCost Corp. | NDP Party of PEI | Mr Michael Bryanton |
| PC Party | Go Daddy Domains Canada | Fresh Media Inc. | Melody Dover |
About This Blog
 I am Peter Rukavina and this is my blog. I am a writer, letterpress printer, and a curious person.
To learn more about me, read my /now, look at my bio, listen to audio I’ve posted, read presentations and speeches I’ve written, or get in touch (peter@rukavina.net is the quickest way).
I have been writing here since May 1999: you can explore the 25+ years of blog posts in the archive.
You can subscribe to an RSS feed of posts, an RSS feed of comments, or a podcast RSS feed that just contains audio posts. You can also receive a daily digests of posts by email.