
On Thursday morning a tweet came my way from Kerry Campbell, Island Morning morning staffer and sometimes-host, throwing down the geek gauntlet:
Peter, we need you to create a website that allows us to track the location of lobster vendors in real-time. I know you can do it.
Rather than mystically incanting such a site into existence, instead thought it better to show Kerry how to create such a tool himself: a Google Maps-based custom map that can be updated by anyone, making it a sort of “wikilobsteria” — a collaboratively edited map that can be co-created by Kerry and his listeners and, presumably, by lobster fishers themselves.
What you’ll need to do this…
- A computer with an Internet connection (preferably a fast one) and a web browser.
- Basic familiarity with Google Maps: how to move and zoom the map to different locations.
- Knowledge of how to “cut and paste” text on your computer.
- A collaborative spirit.
You can click on any of the screen shots below to see a more readable full-sized version.
1. Get a Google Account
You may already have a Google Account, but it’s easy to get one if you don’t: just go to https://www.google.com/accounts/NewAccount and fill out the form you find there, taking note of the account name and password you create for yourself.
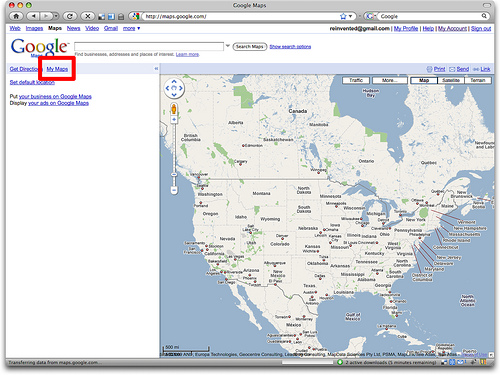
2. Go to Google Maps and Sign In
Go to Google Maps (http://maps.google.com/) and sign in (click on the “Sign In” link in the top-right corner) if you’re not already signed in to your Google Account. Then click on the My Maps link:
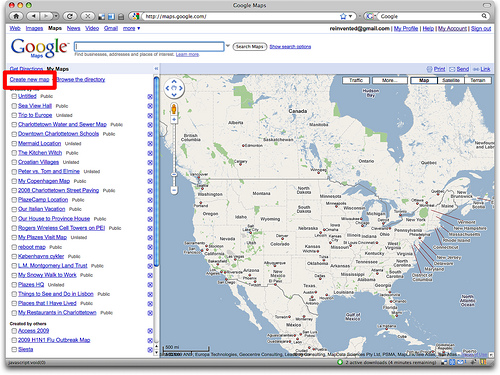
If you’ve created Google Maps before (like I have in this example), you’ll see a list of the maps you created earlier; if you haven’t, this area will be empty.
3. Create a New Map
Click on the Create new map link to create a brand new map:
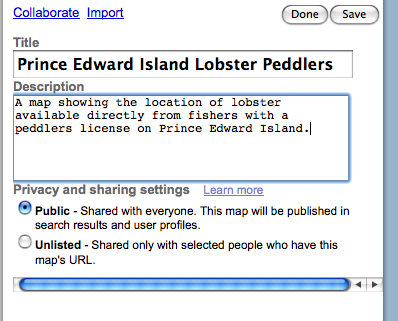
4. Enter a Title and Description
Enter a title and description for your new map. Remember that this is the text that people looking for your map will be searching, so be as descriptive as possible. Make sure you mark your map Public — Shared with everyone so that anyone will be able to see it:
5. Start Adding Markers
Zoom and pan your map window (just like you would with a regular everyday Google Map) to the area where you’re going to start adding markers — i.e. locations where lobster peddlers are located. When you’re in the right area, click on the “marker” icon in the top-left corner of the map (it’s a blue teardrop shape) and then drag your mouse to move the marker to the location you want to mark.
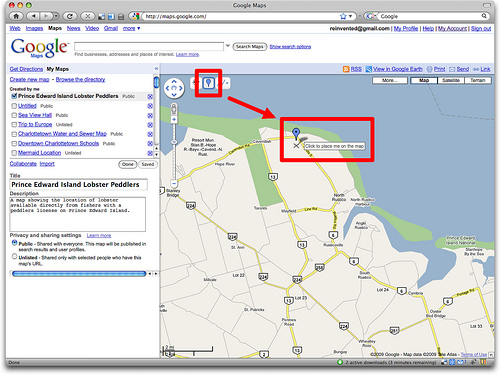
Click the mouse to drop the marker in place and you’ll be prompted to add a title and description for the marker; again, be as descriptive as possible:

Click OK to save your new marker, or Delete if you’ve made a mistake and want to start again. Simply repeat the process for each location on the map you want to mark.
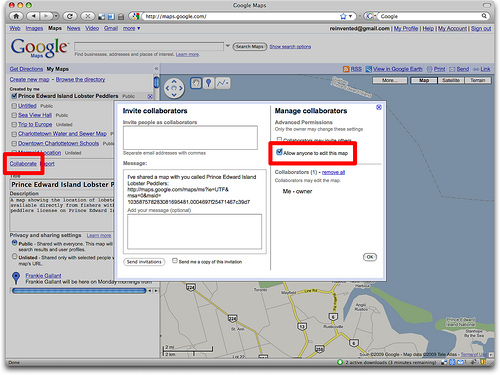
6. Turn on Collaboration
Because you want anyone to be able to edit the map, you need to turn on “collaboration” for the map. Click on the Collaborate link just above the map description and check the Allow anyone to edit this map box and click OK:
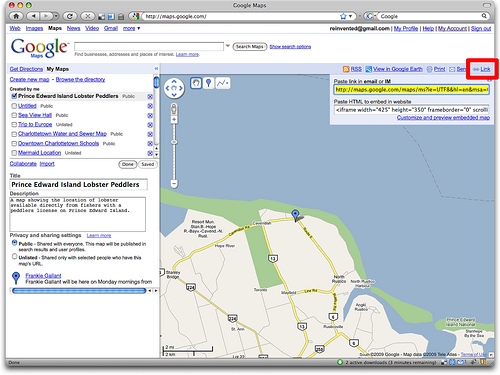
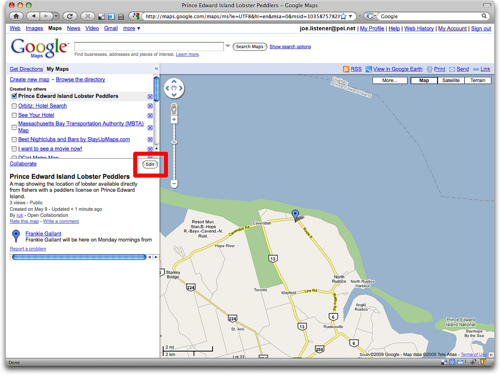
7. Save and Get a Link
Once you’re done adding markers to your map and are ready to save it and unleash the world on it, click the Save button and then the Done button, and then the Link link in the top-right corner of the map. Next, copy-and-paste the web address from the “Paste link in email or IM” box into an email message, instant message or word processor (you’re going to need this link in the next step):
8. Create a Tiny URL
Because you’re likely going to want to share this address — perhaps say it over the radio — you need a shorter way of expressing it. Go to http://tinyurl.com and paste the link you copied from the map into the “Enter a long URL to make tiny” box, and type an easy-to-say word into the “Custom Alias” box — something like peilobster, for example:
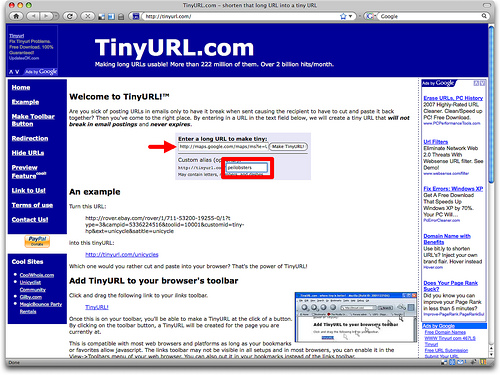
Click the Make TinyURL! button and you’ll have a brand new link — like http://tinyurl.com/peilobster in our example — that will lead to your map. People following the link will see something like this:
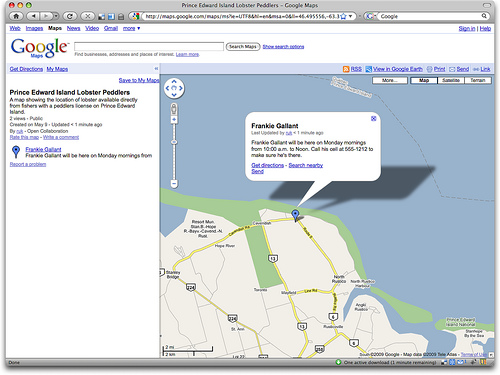
9. How Others Edit
Anyone else who has signed in with their Google Account will, in addition, see an Edit button on your map:
And anyone clicking on that Edit button will be able to add new markers, delete or edit existing markers, add comments to the map, and/or update its title or description.
10. How to Tell Others How to Edit
Here’s a suggested script for telling others how to collaborate on the map:
To see our map, just go to tiny u r l dot com slash p e i lobster. If you want to help make the map, click “Sign in” in the top-right corner, sign in to Google (or create a new Google Account). Once you’re signed in and back at the map, click the “Save to My Maps” link under the map and then Edit to add or update locations.
That’s it. And of course you can do this for any sort of map. I suppose you could even have an Island Morning “help us make the lobster map” contest if you wanted.

Comments
This is a great and detailed suggestion! You are so thoughtful!
Wow. Thanks Peter. That’s a veritable treatise on the topic.
It’s going to take me awhile to digest this… or even read it. But I’m slightly technologically-inclined so I can likely give this a go.
I am, however, going to have to suggest a name change from “wikilobsteria” to something that doesn’t include -eria. Makes me a little uncomfortable about consuming any food that has anything to do with an -eria.
Lobsterpedia?
Lobster Locator?
Lobstervations?
Lobster Positioning System?
Here There Be Lobsters?
Live Lobster Location?
Support Your Local Lobster Here?
The Guardian has another of their excellent maps in the online paper today
http://www.theguardian.pe.ca/index.cfm?sid=250423&sc=98
They use a free mapping application called Map Channels (http://www.mapchannels.com/.
“Map Channels is a service that lets you embed a custom map into your website or blog without the need for coding.
An extensive range of options let you tailor your map’s appearance to your own needs. Options include a place index sidebar and a tools sidebar. Tools available include slide show, map filters, multiple map channels, location links and search channels. Marker tooltips, clickable polygons and lines are standard features. “
It might be worth checking out for the Lobster Locator (Lobstercator?), as it seems to be reasonably easy to setup, is licensed for both commercial and non-commercial use, and is completely free.
Some good suggestions for names here. Although “lobstercator” sounds more like a funky new tool the 21st-century lobster fisher might use to get the lobster out of the trap.