
I decided this afternoon that it was time to try my hand at creating an OS X Dashboard widget to show me live sales information from one of my client’s online stores. To my surprise, I found that this was a lot easier than I thought it was going to be: everyone should be making Dashboard widgets! So here’s how I did it.
Getting the Sales Information
First, I needed a way of getting sales and revenue information for the current day. My client’s online store is a custom PHP application, so it was easy to extract this from a database. I created a little PHP script to do this and called it dashboard.php. Here’s the important part of the PHP code:
<?php

$today = strftime("%Y-%m-%d");

if ($return == "sales") {
   $query = "SELECT count(*) as sales from onlinesales where
             saledate between '$today 00:00:00' and '$today 23:59:59'";

   $result = MYSQL_QUERY($query);
   $currentrecord = 0;
   $sales = trim(MYSQL_RESULT($result,$currentrecord,"sales"));
   $retval = sprintf("%3.0f",$sales);
}
else if ($return == "revenue") {
   $query = "SELECT sum(amount) as revenue from onlinesales where
             saledate between '$today 00:00:00' and '$today 23:59:59'";

   $result = MYSQL_QUERY($query);
   $currentrecord = 0;
   $revenue = trim(MYSQL_RESULT($result,$currentrecord,"howmuch"));
   $retval = "\$" . sprintf("%6.2f",$revenue);
}
$retval = str_replace(" "," ",$retval);
print $retval;
This script returns the number of sales if it’s called like this:
http://www.example.com/dashboard.php?return=sales
Similarly, it returns total revenue if it’s called like this:
http://www.example.com/dashboard.php?return=revenue
What gets returned is a pre-formatted number, ready for magical insertion into my Dashboard widget.
Designing the Widget
Apple provides excellent documentation on how to create widgets, including a Hello World! application. If you have the OS X 10.4 Developer Tools installed, you’ll also find some handy sample code at:
/Developer/Examples/Dashboard/Sample Code/
To start out, I copied the contents of the “Blank Widget” example widget into a new folder called Online Sales:
mkdir "Online Sales"
cd "Online Sales"
cp "/Developer/Examples/Dashboard/Sample Code/Blank Widget/"* .
sudo chown peter:peter *
The last step is required because the permissions on the sample code don’t allow it to be modified; changing ownership to my user and group (peter) let me make changes.
Next, I renamed the sample files for my new widget:
mv BlankWidget.css OnlineSales.css
mv BlankWidget.html OnlineSales.html
mv BlankWidget.js OnlineSales.js
Then I edited the HTML file OnlineSales.html — it’s where the widget gets “drawn” — so that it looks like this:
<html>
<head>
<style type="text/css">
   @import "OnlineSales.css";
</style>
<script type='text/javascript' src='OnlineSales.js' charset='utf-8'/>
</head>
<body onload='setup();'>

   <img src="Default.png">
   <span id="sales" class="salesText"></span>
   <span id="revenue" class="revenueText"></span>
</body>
</html>
I now had a simple HTML file with a hole for the sales figure (the span called sales) and a hole for the revenue figure (the span called revenue). The CSS file called OnlineSales.css is used to style the HTML, and I modified it so that it looks like this:
body {
   margin: 0;
}

.salesText {
   font: 40px "verdana";
   font-weight: bold;
   color: black;
   position: absolute;
   top: 7px;
   left: 25px;
}

.revenueText {
   font: 18px "verdana";
   font-weight: normal;
   color: black;
   position: absolute;
   top: 53px;
   left: 29px;
}
I dropped some “dummy” values into the HTML file and then loaded it up in Safari to see what it would look like; then I tweaked the CSS until it looked like I wanted:
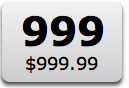
Now I had my widget designed. All that remained was a way of getting the sales and revenue data from the webserver into the widget.
Getting the Web Data
Although Apple has a number of ways to get external data into a widget, the simplest one, and the one that required no learning curve for me, was to use the System Method, a Javascript function available automatically to widgets that allows OS X command line scripts to be run and their results returned to JavaScript.
By default, OS X includes a handy utility called cURL that can act as a sort of “command line browser,” connecting to web servers and retrieving what they return. To run cURL from the command line to grab my sales data is as simple as:
/usr/bin/curl http://www.example.com/dashboard.php?return=sales
This script simply returns something like:
14
…the current number of sales, ready for popping into the hole I’ve created in the widget for this piece of information. The glue that binds all this together lives in the JavaScript OnlineSales.js, that looks like this:
function setup()
{
   UpdateData();
   return 0;
}

if (window.widget)
{
    widget.onshow = UpdateData;
}

function UpdateData () {
  sales = widget.system("/usr/bin/curl
    http://www.example.com/dashboard.php?return=sales",
    null).outputString;
  revenue = widget.system("/usr/bin/curl
     http://www.example.com/dashboard.php?return=revenue",
     null).outputString;

  document.getElementById("sales").innerHTML = sales;
  document.getElementById("revenue").innerHTML = revenue;
}
The JavaScript function UpdateData uses cURL, through the widget.system method, to grab the sales and revenue data from the server, and then updates the widget’s sales and revenue spans with what it retrieved. This is automatically updated whenever Dashboard is activated by gluing the method to the widget.onshow property.
Modifying the Property List
The final step in creating the widget is to modify the Info.plist file, that contains some important settings information. If you double-click on this file in OS X, the Property List Editor will load the file. Here are the settings I set for my widget:
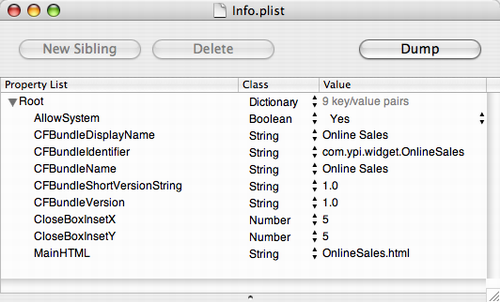
In addition to customizing the defaults already in Info.plist, I added the AllowSystem setting, that, as explained here, you must specify if “your widget requires access to command-line utilities using the widget script object.” I saved the modified Info.plist, and then I was ready to test my widget out.
Testing the Widget
After all of the above, I was left with six files in my Online Sales folder:
- Default.png
- Icon.png
- Info.plist
- OnlineSales.css
- OnlineSales.html
- OnlineSales.js
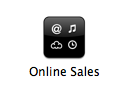
To turn these into a widget is as simple as renaming the Online Sales folder to Online Sales.wdgt. This automagically bundles the files together into a “widget package” that will look like this:
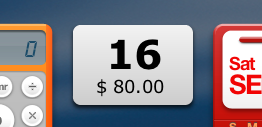
To ease the debugging process, the best way to proceed from here, I found, is to make a duplicate of the widget (select it in the Finder and press “Command+D”) and then double click on the duplicate. If all goes according the plan (and, amazingly enough, it actually did for me), you’ll be prompted to choose whether to install the widget or not, and if you say “Yes,” then the widget should appear on the Dashboard, with live sales information:
A couple things you might want to note:
- It’s a good idea to thoroughly test each step of the process, especially the server-side script, before assembling and testing the widget itself; although there are debugging assists built in to Dashboard, it’s much easier to debug earlier, especially the widget.system call.
- In my real world implementation, my sales data talks to a secure webserver using SSL; to encode username and password data into a cURL call is as easy as modifying the JavaScript to use the form /usr/bin/curl -u username:password.
- I didn’t do any customizing of the icon or the default “Blank Widget” look and feel; obviously if I was going to make a widget for distribution, I would do that.
Following the steps I went through, it should be easy to make a Dashboard widget to display almost any sort of “up to the minute” kind of data. If you go ahead and do this, please post a comment with your experiences.
About This Blog
 I am Peter Rukavina and this is my blog. I am a writer, letterpress printer, and a curious person.
To learn more about me, read my /now, look at my bio, listen to audio I’ve posted, read presentations and speeches I’ve written, see things I’ve favourited elsewhere, or get in touch (peter@rukavina.net is the quickest way).
I have been writing here since May 1999: you can explore the 25+ years of blog posts in the archive.
![]() You can subscribe to an RSS feed of posts, an RSS feed of comments, an RSS feed of favourites elsewhere, or a podcast RSS feed that just contains audio posts. You can also receive a daily digests of posts by email. I also publish an OPML blogroll.
You can subscribe to an RSS feed of posts, an RSS feed of comments, an RSS feed of favourites elsewhere, or a podcast RSS feed that just contains audio posts. You can also receive a daily digests of posts by email. I also publish an OPML blogroll.
Instagram • YouTube • Vimeo • ORCID • OpenStreetMap • Internet Archive • PEI.art • Drupal • Github.
Comments
Completely awesome, Peter.
Completely awesome, Peter. This is the best tutorial to date, on anything. Thanks, thanks.
Hi!I try to use curl to
Hi!
I try to use curl to download a zip file into the widget is this possible ? When I call curl from the widget.system I don’t see the file anywhere. I use the —output option. But doesn’t seems to work. Any ideas ?
Thanks!
Nice article. You should
Nice article. You should consider using XMLHttpRequest for fetching the data instead of curl. Maybe it deserves an article ;)
Thanks for sharing dude.. :)
Thanks for sharing dude.. :)
Add new comment